
你可以将若干 ClusterRole 聚合(Aggregate) 起来,形成一个复合的 ClusterRole。 作为集群控制面的一部分,控制器会监视带有 aggregationRule 的 ClusterRole 对象集合。aggregationRule 为控制器定义一个标签选择算符供后者匹配应该组合到当前 ClusterRole 的 roles 字段中的 ClusterRole 对象。
注意:控制平面会覆盖你在聚合 ClusterRole 的 rules 字段中手动指定的所有值。 如果你想更改或添加规则,请在被 aggregationRule 所选中的 ClusterRole 对象上执行变更。
比如,匹配rbac.example.com/aggregate-to-monitoring: "true"标签来创建聚合ClusterRole:
kind: ClusterRole
apiVersion: rbac.authorization.k8s.io/v1
metadata:
  name: monitoring
aggregationRule:
  clusterRoleSelectors:
  - matchLabels:
      rbac.example.com/aggregate-to-monitoring: "true"
rules: [] # Rules are automatically filled in by the controller manager.
然后创建与标签选择器匹配的ClusterRole向聚合ClusterRole添加规则:
kind: ClusterRole
apiVersion: rbac.authorization.k8s.io/v1
metadata:
  name: monitoring-endpoints
  labels:
    rbac.example.com/aggregate-to-monitoring: "true"
# These rules will be added to the "monitoring" role.
rules:
- apiGroups: [""]
  resources: ["services", "endpoints", "pods"]
  verbs: ["get", "list", "watch"]
下面进行示例演示:
1.定义一个yaml文件,权限为空
[root@k8s-master01 study]# vim a-clusterrole.yaml
kind: ClusterRole
apiVersion: rbac.authorization.k8s.io/v1
metadata:
  name: test-aggregation
aggregationRule:
  clusterRoleSelectors:
  - matchLabels:
      rbac.example.com/aggregate-to-test-aggregation: "true"
rules: [] # Rules are automatically filled in by the controller manager.
2.创建ClusterRole
[root@k8s-master01 study]# kubectl create -f a-clusterrole.yaml
clusterrole.rbac.authorization.k8s.io/test-aggregation created
3.查看ClusterRole权限为空
[root@k8s-master01 study]# kubectl get  -f a-clusterrole.yaml -oyaml
aggregationRule:
  clusterRoleSelectors:
  - matchLabels:
      rbac.example.com/aggregate-to-test-aggregation: "true"
apiVersion: rbac.authorization.k8s.io/v1
kind: ClusterRole
metadata:
  creationTimestamp: "2022-12-11T11:17:43Z"
  name: test-aggregation
  resourceVersion: "63924"
  uid: fda32c93-0897-489f-a51e-ff6c48d2a6ee
rules: null
4.创建一个sa
[root@k8s-master01 study]# kubectl create sa test-aggregation
serviceaccount/test-aggregation created
5.查看token,用于登录dashboard
[root@k8s-master01 study]# kubectl get secret
NAME                           TYPE                                  DATA   AGE
default-token-x2cgk            kubernetes.io/service-account-token   3      9d
test-aggregation-token-m7qmn   kubernetes.io/service-account-token   3      19s

[root@k8s-master01 study]# kubectl describe secret test-aggregation-token-m7qmn
Name:         test-aggregation-token-m7qmn
Namespace:    default
Labels:       <none>
Annotations:  kubernetes.io/service-account.name: test-aggregation
              kubernetes.io/service-account.uid: 117b107d-4116-4b28-83a5-fb1abda52b8e

Type:  kubernetes.io/service-account-token

Data
====
token:      eyJhbGciOiJSUzI1NiIsImtpZCI6IjNISFg5NWpEa0VIYXMyMG5YSGdaaHhDUVVMQXgzYzdQbmlCWmZSeU1GSG8ifQ.eyJpc3MiOiJrdWJlcm5ldGVzL3NlcnZpY2VhY2NvdW50Iiwia3ViZXJuZXRlcy5pby9zZXJ2aWNlYWNjb3VudC9uYW1lc3BhY2UiOiJkZWZhdWx0Iiwia3ViZXJuZXRlcy5pby9zZXJ2aWNlYWNjb3VudC9zZWNyZXQubmFtZSI6InRlc3QtYWdncmVnYXRpb24tdG9rZW4tbTdxbW4iLCJrdWJlcm5ldGVzLmlvL3NlcnZpY2VhY2NvdW50L3NlcnZpY2UtYWNjb3VudC5uYW1lIjoidGVzdC1hZ2dyZWdhdGlvbiIsImt1YmVybmV0ZXMuaW8vc2VydmljZWFjY291bnQvc2VydmljZS1hY2NvdW50LnVpZCI6IjExN2IxMDdkLTQxMTYtNGIyOC04M2E1LWZiMWFiZGE1MmI4ZSIsInN1YiI6InN5c3RlbTpzZXJ2aWNlYWNjb3VudDpkZWZhdWx0OnRlc3QtYWdncmVnYXRpb24ifQ.puyWOqWYdkNKIeWTLQ3WuvFq-qWyvOt8AbgvgaU2T_ODNThIFGXQOqp4CEY7w9gB2EMJoMnMUAUJqb02RotY7lapyFTYgf2StkEZMlcByJRPjSIPYcDRP78Jvg7TlaZuGaJ9-biTBMIGCMUbLvQWYHq8cmjjsmFU68JRdKFRdcOqhplH16wfuVeS10OLFv4hihehH1wWDMw9xCB0q_NQm5Mk8cy0zY3pTO0qHFSuAsczb4zHU6LknctxA-xJLvT0m9DZvaR3E5o0BGlYeT5quUHger8-Anyhtce6lxX1WLCaJ9pRFgXfTOOtP90n14-KXjrPiWruQEsLMeEhk4eTkA
ca.crt:     1099 bytes
namespace:  7 bytes
说明:上面的token需要根据自己的环境进行查看
6.新建一个clusterrolebinding绑定clusterrole
[root@k8s-master01 study]# kubectl create clusterrolebinding test-aggregation --clusterrole=test-aggregation --serviceaccount=defalut:test-aggregation
7.在Master01节点上查看端口号,观察到端口号为30757
[root@k8s-master01 study]# kubectl get svc kubernetes-dashboard -n kubernetes-dashboard
NAME                   TYPE       CLUSTER-IP    EXTERNAL-IP   PORT(S)         AGE
kubernetes-dashboard   NodePort   10.0.90.127   <none>        443:30757/TCP   9d
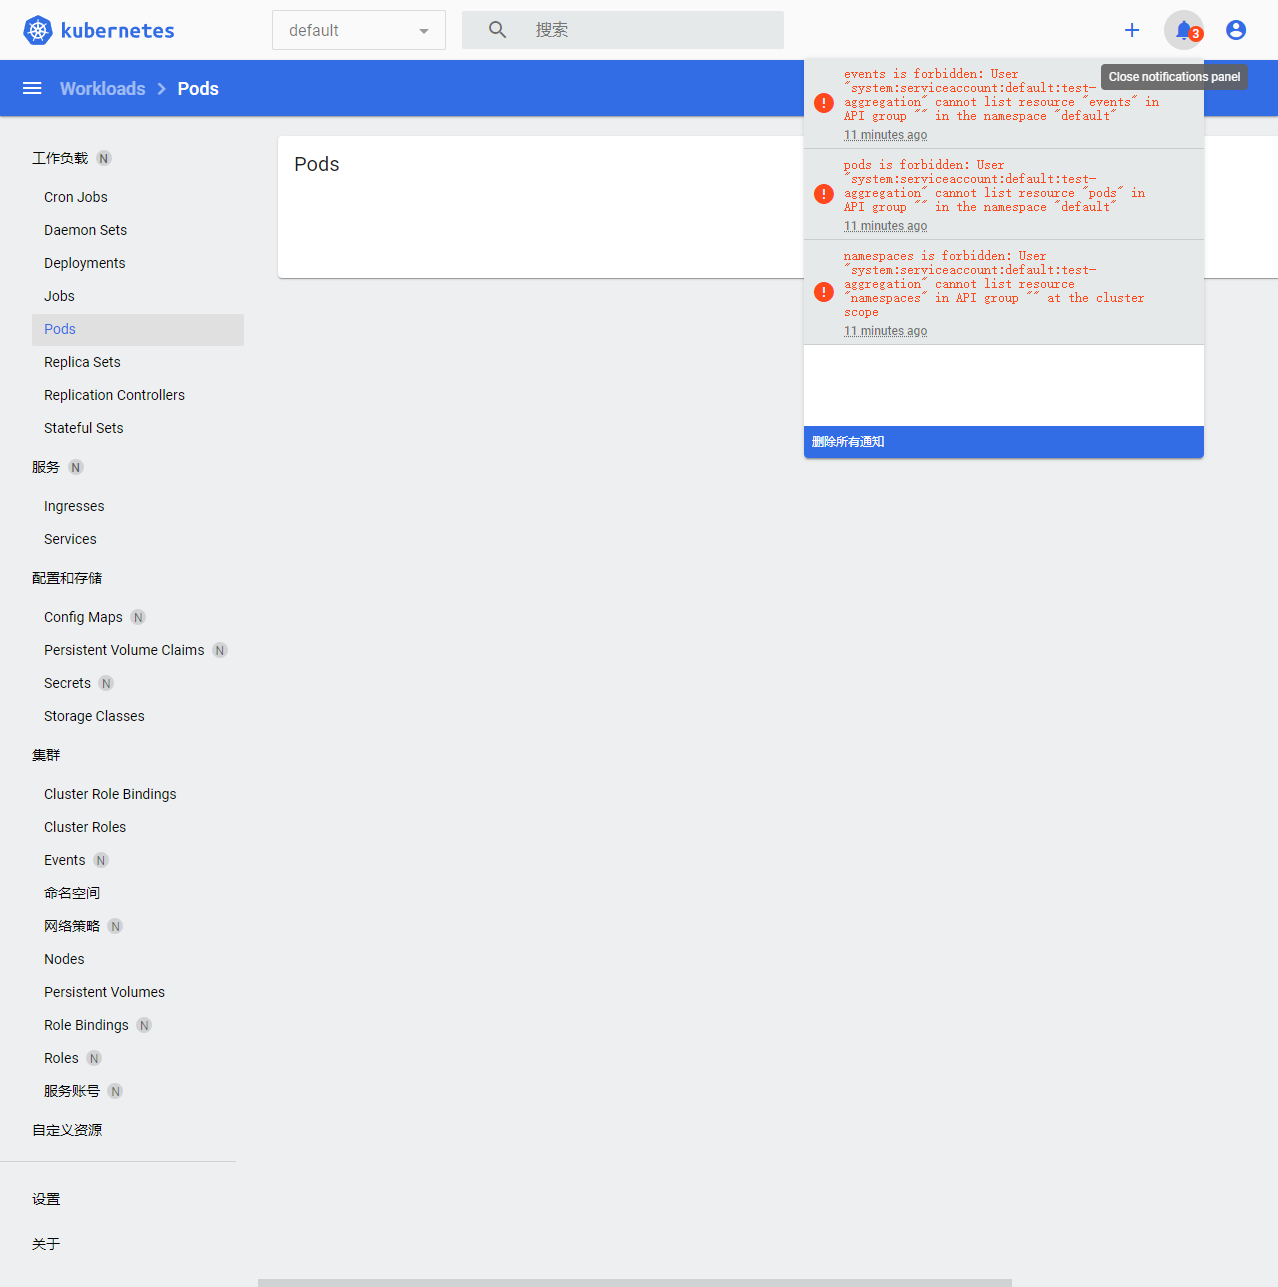
8.根据自己的实例端口号,通过任意安装了kube-proxy的宿主机的IP+端口即可访问到dashboard。https://192.168.100.31:30757,选择登录方式为令牌(即token方式)。发现权限不够
9.新建一个ClusterRole,通过rbac.example.com/aggregate-to-monitoring: "true"标签创建聚合ClusterRole
[root@k8s-master01 study]# vim b-clusterrole.yaml
kind: ClusterRole
apiVersion: rbac.authorization.k8s.io/v1
metadata:
  name: b-aggregation
  labels:
    rbac.example.com/aggregate-to-test-aggregation: "true"
# These rules will be added to the "monitoring" role.
rules:
- apiGroups: [""]
  resources: ["services", "endpoints", "pods","namespaces"]
  verbs: ["get", "list", "watch"]
10.创建一个权限
[root@k8s-master01 study]# kubectl create -f b-clusterrole.yaml
clusterrole.rbac.authorization.k8s.io/b-aggregation created
11.查看权限是否更新,观察到权限已经更改
[root@k8s-master01 study]# kubectl get  -f a-clusterrole.yaml -oyaml
aggregationRule:
  clusterRoleSelectors:
  - matchLabels:
      rbac.example.com/aggregate-to-test-aggregation: "true"
apiVersion: rbac.authorization.k8s.io/v1
kind: ClusterRole
metadata:
  creationTimestamp: "2022-12-11T11:17:43Z"
  name: test-aggregation
  resourceVersion: "64549"
  uid: fda32c93-0897-489f-a51e-ff6c48d2a6ee
rules:
- apiGroups:
  - ""
  resources:
  - services
  - endpoints
  - pods
  - namespaces
  verbs:
  - get
  - list
  - watch
12.在浏览器上刷新进行查看,观察到指定权限可以操作