
一、重定向 -- Redirect
官方文档:https://apisix.apache.org/zh/docs/apisix/plugins/redirect/
重定向:在接收到客户端请求时,根据预设规则将其引导至不同的URL或其他服务。
redirect 重定向插件,可配置的属性如下所示:
| 名称 | 类型 | 必 选 项 | 默认 值 | 有效值 | 描述 |
| ------------------- | ------------- | ------------ | :---------- | ------------ | ------------------------------------------------------------ |
| http_to_https | boolean | 否 | false | [true,false] | 当设置为 true 并且请求是 HTTP 时, 它将被重定向具有相同![ref1] URI 和 301 状态 码的 HTTPS,原 URI 的查询字符串也将 包含在 Location 头中。 |
| uri | string | 否 | | | 要重定向到的 URI,可以包含 NGINX 变 量。例如: /test/index.htm ,$uri/index.html ,${uri}/index.html ,https://example.com/foo/bar 。如 果你引入了一个不存在的变量,它不会报 错,而是将其视为一个空变量。 |
| regex_uri | array[string] | 否 | | | 将来自客户端的 URL 与正则表达式匹配 并重定向。当匹配成功后使用模板替换发 送重定向到客户端,如果未匹配成功会将客户端请求的 URI 转发至上游。和regex_uri 不可以同时存在。例如: ["^/iresty/(.)/(.)/(.*)","/$1-$2-$3"] 第一个 元素代表匹配来自客户端请求的 URI 正 则表达式,第二个元素代表匹配成功后发送重定向到客户端的 URI 模板。 |
| ret_code | integer | 否 | 302 | [200, ...] | HTTP 响应码 |
| encode_uri | boolean | 否 | false | [true,false] | 当设置为 true 时,对返回的![ref1]Location Header 按照 RFC3986 的编 码格式进行编码。 |
| append_query_string | boolean | 否 | false | [true,false] | 当设置为 true 时,将原始请求中的查询字符串添加到 Location Header。如果已配置 uri 或 regex_uri 已经包含查询字符串,则请求中的查询字符串将附加一个 & 。如果你已经处理过查询字符串(例如,使用 NGINX 变量$request_uri ),请不要再使用该参数以避免重复。 |
-
NOTE
-
http_to_https 、 uri 和 regex_uri 只能配置其中一个属性。
-
http_to_https 、和 append_query_string 只能配置其中一个属性。
-
当开启 http_to_https 时,重定向 URL 中的端口将按如下顺序选取一个值(按优先级从高 到低排列)
-
从配置文件( conf/config.yaml )中读取 plugin_attr.redirect.https_port 。
-
如果 apisix.ssl 处于开启状态,读取 apisix.ssl.listen 并从中随机选一个port 。
-
使用 443 作为默认 https port 。
-
例1)应用访问统一访问路径,访问 http://whoami.example.com/tls 跳转到 http://whoami.example.com/tls/
Demo 例子:
[root@master01 16]# vim whoami-dp.yml

apiVersion: v1

kind: Service

metadata:

  name: whoami

spec:

  ports:

    - protocol: TCP

      name: web

      port: 80

  selector:

    app: whoami

---

kind: Deployment

apiVersion: apps/v1

metadata:

  name: whoami

  labels:

    app: whoami

spec:

  replicas: 1

  selector:

    matchLabels:

      app: whoami

  template:

    metadata:

      labels:

        app: whoami

    spec:

      containers:

        - name: whoami

          image: registry.cn-hangzhou.aliyuncs.com/github_images1024/whoami:v1.5.0

          ports:

            - name: web

              containerPort: 80

# 应用

[root@master01 16]# kaf whoami-dp.yml
要实现我们的需求直接使用 regex_uri 这个属性即可,只需要去匹配 /tls 的请求,然后进行跳转即可,更新 ApisixRoute 对象:
[root@master01 16]# vim whoami-ing.yml

apiVersion: apisix.apache.org/v2

kind: ApisixRoute

metadata:

  name: whoami-apisix

spec:

  http:

    - name: whoami-root

      match:

        hosts:

          - whoami.example.com

        paths:

          - '/tls*'

      backends:

        - serviceName: whoami

          servicePort: 80

      plugins:

        - name: redirect

          enable: true

          config:

            regex_uri: ['^(/tls)$', '$1/']

# 应用

[root@master01 16]# kaf whoami-ing.yml

# 验证

[root@master01 16]# kg ar

NAME            HOSTS                        URIS                         AGE

default-route   ["httpbin.example.com"]   ["/httpbin*","/spec.json"]   41m

whoami-apisix   ["whoami.example.com"]    ["/tls*"]                    17m
我们新启用了一个 redirect 插件,并配置 regex_uri: ['^(/tls)$', '\$1/']
测试验证:
[root@master01 16]# curl whoami.example.com/tls -i

HTTP/1.1 302 Moved Temporarily

Date: Sun, 20 Apr 2025 08:30:59 GMT

Content-Type: text/html

Content-Length: 217

Connection: keep-alive

Location: /tls/

Server: APISIX/3.8.0

<html>

<head><title>302 Found</title></head>

<body>

<center><h1>302 Found</h1></center>

<hr><center>openresty</center>

<p><em>Powered by <a href="https://apisix.apache.org/">APISIX</a>.</em></p></body>

</html>
WEB 验证:
浏览器中输入whoami.example.com/tls
环境复原
[root@master01 16]# k delete -f whoami-ing.yml
例2)实现临时或永久的页面跳转,这对于站点迁移、版本升级等情况极为有用。
[root@master01 16]# vim whoami-redirect301.yaml

apiVersion: apisix.apache.org/v2

kind: ApisixRoute

metadata:

  name: whoami-apisix

spec:

  http:

    - name: whoami-root

      match:

        hosts:

          - whoami.example.com

        paths:

          - '/tls*'

      backends:

        - serviceName: whoami

          servicePort: 80

      plugins:

        - name: redirect

          enable: true

          config:

            uri: "https://www.baidu.com"

            #注意不要加双引号,类型是integer,非string

            ret_code: 301

# 应用

[root@master01 16]# kaf whoami-redirect301.yaml
测试验证:
[root@master01 16]# curl whoami.example.com/tls -i

HTTP/1.1 301 Moved Permanently

Date: Sun, 20 Apr 2025 08:36:03 GMT

Content-Type: text/html

Content-Length: 241

Connection: keep-alive

Location: https://www.baidu.com

Server: APISIX/3.8.0

<html>

<head><title>301 Moved Permanently</title></head>

<body>

<center><h1>301 Moved Permanently</h1></center>

<hr><center>openresty</center>

<p><em>Powered by <a href="https://apisix.apache.org/">APISIX</a>.</em></p></body>

</html>
环境复原:
[root@master01 16]# k delete -f whoami-redirect301.yaml
例3)访问 HTTP 站点的时候,将 HTTP 请求自动重定向到 HTTPS,以增强服务安全性,只需要在该插件下面设置config.http_to_https=true即可:
[root@master01 16]# vim whoami-https.yaml

apiVersion: apisix.apache.org/v2

kind: ApisixRoute

metadata:

  name: whoami-apisix

spec:

  http:

    - name: whoami-root

      match:

        hosts:

          - whoami.example.com

        paths:

          - '/tls*'

      backends:

        - serviceName: whoami

          servicePort: 80

      plugins:

        - name: redirect

          enable: true

          config:

            http_to_https: true

# 应用

[root@master01 16]# kaf whoami-https.yaml
测试验证:
[root@master01 16]# curl whoami.example.com/tls -i

HTTP/1.1 301 Moved Permanently

Date: Sun, 20 Apr 2025 08:40:54 GMT

Content-Type: text/html

Content-Length: 241

Connection: keep-alive

Location: https://whoami.example.com:9443/tls

Server: APISIX/3.8.0

<html>

<head><title>301 Moved Permanently</title></head>

<body>

<center><h1>301 Moved Permanently</h1></center>

<hr><center>openresty</center>

<p><em>Powered by <a href="https://apisix.apache.org/">APISIX</a>.</em></p></body>

</html>
环境复原
[root@master01 16]# k delete -f whoami-https.yaml
二、证书 -- tls
使用 openssl 创建一个自签名的证书,当然你有正规 CA 机构购买的证书的话直接将证书下载下来使用即可:
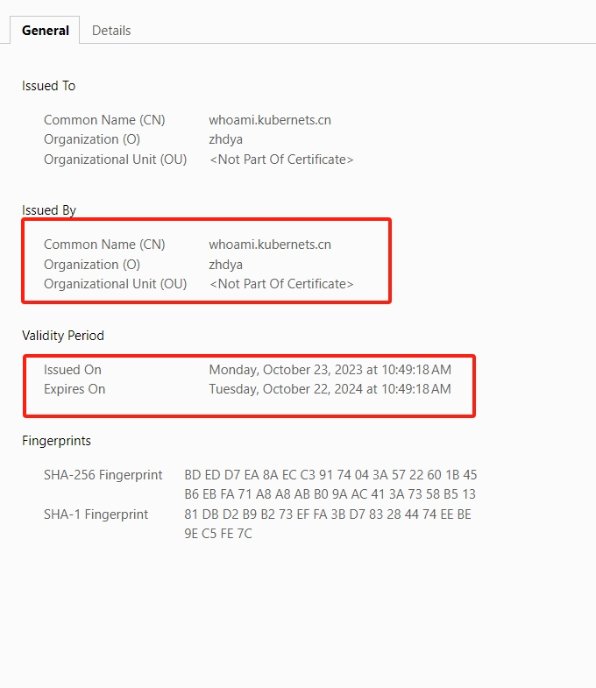
[root@master01 16]# openssl req -x509 -nodes -days 365 -newkey rsa:2048 -keyout tls.key -out tls.crt -subj "/CN=whoami.example.com/O=zhdya"
然后通过 Secret 对象来引用上面创建的证书文件:
# 要注意证书文件名称必须是 tls.crt 和 tls.key

[root@master01 16]# kubectl create secret tls who-tls --cert=tls.crt --key=tls.key
然后就可以创建一个 ApisixTls 资源对象,引用上面的 Secret 即可:
[root@master01 16]# vim whoami-ing-tls.yml

apiVersion: apisix.apache.org/v2

kind: ApisixTls

metadata:

  name: who-tls

spec:

  hosts:

    - whoami.example.com

  secret:

    name: who-tls

    namespace: default

# 应用

[root@master01 16]# kaf whoami-ing-tls.yml
如果单独做这证书这一小节,需要部署如下内容
[root@master01 16]# vim whoami-https.yaml

apiVersion: apisix.apache.org/v2

kind: ApisixRoute

metadata:

  name: whoami-apisix

spec:

  http:

    - name: whoami-root

      match:

        hosts:

          - whoami.example.com

        paths:

          - '/tls*'

      backends:

        - serviceName: whoami

          servicePort: 80

      plugins:

        - name: redirect

          enable: true

          config:

            http_to_https: true

# 应用

[root@master01 16]# kaf whoami-https.yaml
查看验证:
[root@master01 16]# kg atls -A

NAMESPACE   NAME      SNIS                        SECRET NAME   SECRET NAMESPACE   AGE

default     who-tls   ["whoami.example.com"]   who-tls       default            9s

# 测试访问

[root@master01 16]# curl whoami.example.com/tls -I

HTTP/1.1 301 Moved Permanently

Date: Sun, 20 Apr 2025 08:49:27 GMT

Content-Type: text/html

Content-Length: 241

Connection: keep-alive

Location: https://whoami.example.com:9443/tls

Server: APISIX/3.8.0
同时 APISIX TLS 还可以配置 spec.client ,用于进行 mTLS 双向认证的配置。
上面的资源对象创建完成后,即可访问 https 服务了(chrome 浏览器默认会限制不安全的证书,只需要在页面上输入 thisisunsafe 即可访问了):
浏览器中输入whoami.example.com/tls,它会自动变为https://whoami.example.com:9443/tls需要将9443去掉,变为https://whoami.example.com/tls
环境复原
[root@master01 16]# k delete -f whoami-https.yaml
三、URL跳转 -- Proxy-rewrite
官方文档:https://apisix.apache.org/zh/docs/apisix/plugins/proxy-rewrite/
需求:当访问 http://whoami.example.com/v1 时,流量会通过正则匹配 '^/v1(/|$)(.*)', '/$2' 调度至 whoami。
当访问 http://whoami.example.com/v2 时,流量会通过正则匹配 '^/v2(/|$)(.*)', '/$2' 调度至nginx。
创建两个 ApiSixRoute 规则,根据不同的访问路径代理至相对应的 service。
[root@master01 16]#

cat > appv1.yaml <<EOF

apiVersion: apps/v1

kind: Deployment

metadata:

  name: appv1

spec:

  selector:

    matchLabels:

      app: appv1

  template:

    metadata:

      labels:

        use: test

        app: appv1

    spec:

      containers:

      - image: registry.cn-hangzhou.aliyuncs.com/github_images1024/nginx:1.21.6

        name: appv1

        command: ["/bin/sh", "-c", "echo '你好, 这是APP-v1服务中心'>/usr/share/nginx/html/index.html;nginx -g 'daemon off;'"]

        ports:

          - containerPort: 80

            name: portv1

---

apiVersion: v1

kind: Service

metadata:

  name: appv1

spec:

  selector:

    app: appv1

  ports:

    - name: http

      port: 80

      targetPort: portv1

EOF
whoami V1 应用的路由:
[root@master01 16]#

cat > who-ingressv1.yaml <<EOF

apiVersion: apisix.apache.org/v2

kind: ApisixRoute

metadata:

  name: whoami-apisix

spec:

  http:

    - name: whoami-root

      match:

        hosts:

          - whoami.example.com

        paths:

          - '/v1*'

      backends:

        - serviceName: whoami

          servicePort: 80

      plugins:

        - name: proxy-rewrite

          enable: true

          config:

            regex_uri: ['^/v1(/|$)(.*)', '/']

EOF
whoami V2 应用的路由:
[root@master01 16]#

cat > who-ingressv2.yaml <<EOF

apiVersion: apisix.apache.org/v2

kind: ApisixRoute

metadata:

  name: app-apisix

spec:

  http:

    - name: app-root

      match:

        hosts:

          - whoami.example.com

        paths:

          - '/v2*'

      backends:

        - serviceName: appv1

          servicePort: 80

      plugins:

        - name: proxy-rewrite

          enable: true

          config:

            regex_uri: ['^/v2(/|$)(.*)', '/']

EOF
应用上面路由
[root@master01 16]# kaf appv1.yaml

[root@master01 16]# kaf who-ingressv1.yaml

[root@master01 16]# kaf who-ingressv2.yaml

#验证

[root@master01 16]# kg -f appv1.yaml

NAME                    READY   UP-TO-DATE   AVAILABLE   AGE

deployment.apps/appv1   1/1     1            1           67s

NAME            TYPE        CLUSTER-IP      EXTERNAL-IP   PORT(S)   AGE

service/appv1   ClusterIP   <appv1-service-ip>   <none>        80/TCP    67s

[root@master01 16]# kg -f who-ingressv1.yaml

NAME            HOSTS                       URIS       AGE

whoami-apisix   ["whoami.example.com"]   ["/v1*"]   12m

[root@master01 16]# kg -f who-ingressv2.yaml

NAME         HOSTS                       URIS       AGE

app-apisix   ["whoami.example.com"]   ["/v2*"]   103s
这里我们启用一个 proxy-rewrite 插件,并且将所有 /v1 和 v2 路径的请求都重写到了 / 路径下。
测试访问:http://whoami.example.com/v1 跳转到 whoami 的 /;

测试访问:http://whoami.example.com/v2 跳转到 nginx 的服务;

环境复原
[root@master01 16]# k delete -f appv1.yaml

[root@master01 16]# k delete -f who-ingressv1.yaml

[root@master01 16]# k delete -f who-ingressv2.yaml
四、黑/白名单 -- IP-Restriction
官方文档:https://apisix.apache.org/zh/docs/apisix/plugins/ip-restriction/
ip-restriction 插件可以通过将 IP 地址列入白名单或黑名单来限制对服务或路由的访问。 支持对单个IP 地址、多个 IP 地址和类似 10.1.1.0/24 的 CIDR(无类别域间路由)范围的限制。
| 参数名 | 类型 | 必 选 项 | 默认值 | 有效值 | 描述 |
| ---------- | ------------- | ------------ | -------------------------------- | ---------- | ---------------------------------------- |
| whitelist | array[string] | 否 | | | 加入白名单的 IP 地 址或 CIDR 范围。 |
| blacklist | array[string] | 否 | | | 加入黑名单的 IP 地 址或 CIDR 范围。 |
| message | string | 否 | “Your IP address is not allowed” | [1,1024] | 在未允许的 IP 访问 的情况下返回的信 息。 |
示例:
拒绝 <private-cidr> 及 <blocked-ip> 这个IP和网段访问v2版本
[root@master01 16]#

cat > who-iprestriction.yaml <<EOF

apiVersion: apisix.apache.org/v2

kind: ApisixRoute

metadata:

  name: app-apisix

spec:

  http:

    - name: app-root

      match:

        hosts:

          - whoami.example.com

        paths:

          - '/v2*'

      backends:

        - serviceName: whoami

          servicePort: 80

      plugins:

        - name: proxy-rewrite

          enable: true

          config:

            regex_uri: ['^/v2(/|$)(.*)', '/']

        - name: real-ip

          enable: true

          config:

            source: "http_x_forwarded_for"

        - name: ip-restriction

          enable: true

          config:

            blacklist: ["<private-cidr>" ,"<blocked-ip>"]

EOF

# 应用

[root@master01 16]# kaf who-iprestriction.yaml
测试验证:
# 未被限制
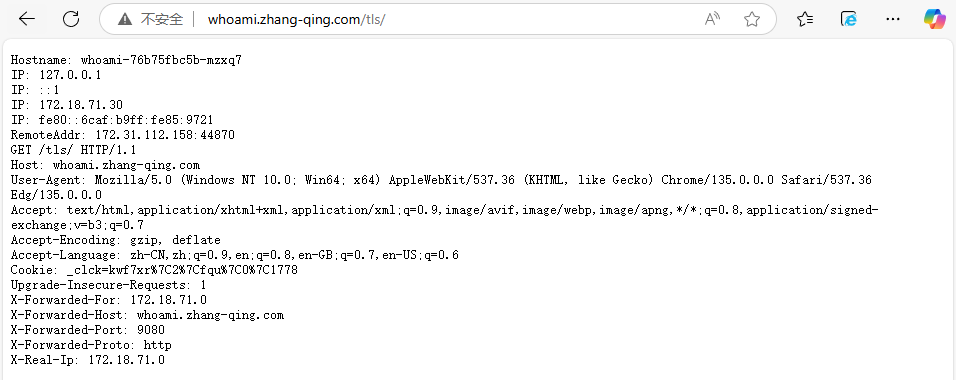
[root@master01 16]# curl whoami.example.com/v2
Hostname: whoami-76b75fbc5b-mzxq7
IP: 127.0.0.1
IP: ::1
IP: <whoami-pod-ip>
IP: fe80::6caf:b9ff:fe85:9721
RemoteAddr: 172.31.112.158:51096
GET / HTTP/1.1
Host: whoami.example.com
User-Agent: curl/7.29.0
Accept: */*
X-Forwarded-For: <client-ip>
X-Forwarded-Host: whoami.example.com
X-Forwarded-Port: 9080
X-Forwarded-Proto: http
X-Real-Ip: <client-ip>
# 限制后
[root@master01 16]# curl whoami.example.com/v2 -H "X-Forwarded-For: <blocked-ip>"
{"message":"Your IP address is not allowed"}
环境复原
[root@master01 16]# k delete -f who-iprestriction.yaml
五、认证
Apache APISIX 作为一个 API 网关,目前已开启与各种插件功能的适配合作,插件库也比较丰富。目前已经可与大量身份认证相关的插件进行搭配处理,如下图所示。
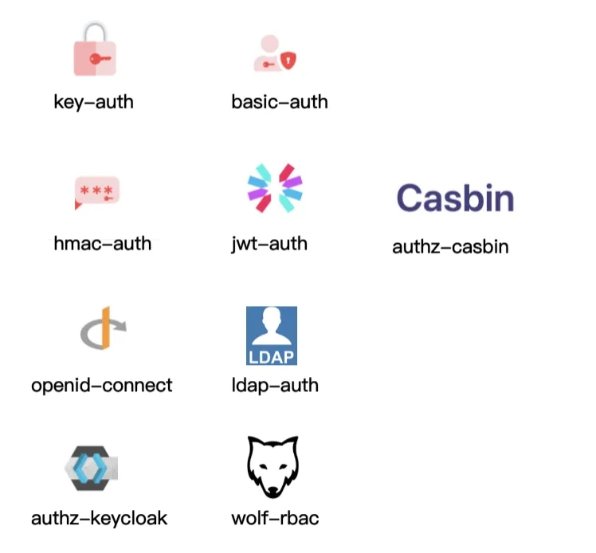
基础认证插件: Key-Auth 、 Basic-Auth ,他们是通过账号密码的方式进行认证。
基于请求信息: Hmac-Auth 、 JWT-Auth ,如 Hmac-Auth 通过对请求信息做一些加密。
通用认证协议和联合第三方组件:例如 OpenID-Connect 身份认证机制,以及 LDAP 认证等。
Consumer:Consumer 是某类服务的消费者,需要与用户认证配合才可以使用。
官方数据:https://apisix.apache.org/zh/docs/apisix/next/terminology/consumer/
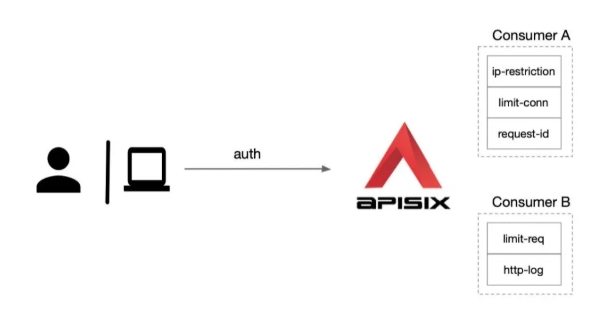
APISIX 还可以针对每一个 Consumer (即调用方应用)去做不同级别的插件配置:
六、Basic-Auth
官方文档:https://apisix.apache.org/zh/docs/apisix/plugins/basic-auth/
基本认证: basic-auth 是一个认证插件,它需要与 Consumer 一起配合才能工作。添加 Basic Auth 到一个 Service 或 Route,然后 Consumer 将其用户名和密码添加到请求头中以验证其请求。
首先需要在 APISIX Consumer 消费者中增加 basic auth 认证配置,为其指定用户名和密码,如下所示:
[root@master01 16]#

cat > basic-auth.yaml <<EOF

apiVersion: apisix.apache.org/v2

kind: ApisixConsumer

metadata:

  name: whoamibauth

spec:

  authParameter:

    basicAuth:

      value:

        username: admin

        password: <basic-auth-password>

EOF

# 应用

[root@master01 16]# kaf basic-auth.yaml
ApisixConsumer 资源对象中只需要配置 authParameter 认证参数即可,目前只支持 BasicAuth 与KeyAuth 两种认证类型。
在 ApisixRoute 中添加 authentication ,将其开启并指定认证类型即可,就可以实现使用Consumer 去完成相关配置认证,如下所示:
[root@master01 16]#

cat > basic-auth-ing.yaml <<EOF

apiVersion: apisix.apache.org/v2

kind: ApisixRoute

metadata:

  name: whoami-apisix

spec:

  http:

    - name: whoami-root

      match:

        hosts:

          - whoami.example.com

        paths:

          - '/tls*'

          - '/v1*'

      backends:

        - serviceName: whoami

          servicePort: 80

      plugins:

        - name: redirect

          enable: true

          config:

            regex_uri: ['^(/tls)$', '/']

        - name: proxy-rewrite

          enable: true

          config:

            regex_uri: ['^/v1(/|$)(.*)', '/']

      authentication:

        enable: true

        type: basicAuth

EOF

# 应用

[root@master01 16]# kaf basic-auth-ing.yaml
直接更新上面的资源即可开启 basic auth 认证了。
测试验证:
[root@master1 /root/apisix]# curl http://whoami.example.com/tls

{"message":"Missing authorization in request"}

# 返回 401 Unauthorized

[root@master01 16]# curl -v http://whoami.example.com/tls

* About to connect() to whoami.example.com port 80 (#0)

*   Trying <gateway-ip>...

* Connected to whoami.example.com (<gateway-ip>) port 80 (#0)

> GET /tls HTTP/1.1

> User-Agent: curl/7.29.0

> Host: whoami.example.com

> Accept: */*

>

< HTTP/1.1 401 Unauthorized

< Date: Sun, 20 Apr 2025 09:48:14 GMT

< Content-Type: text/plain; charset=utf-8

< Transfer-Encoding: chunked

< Connection: keep-alive

< WWW-Authenticate: Basic realm='.'

< Server: APISIX/3.8.0

<

{"message":"Missing authorization in request"}

* Connection #0 to host whoami.example.com left intact

# 返回302

[root@master01 16]# curl -u admin:<basic-auth-password> http://whoami.example.com/tls

<html>

<head><title>302 Found</title></head>

<body>

<center><h1>302 Found</h1></center>

<hr><center>openresty</center>

<p><em>Powered by <a href="https://apisix.apache.org/">APISIX</a>.</em></p></body>

</html>
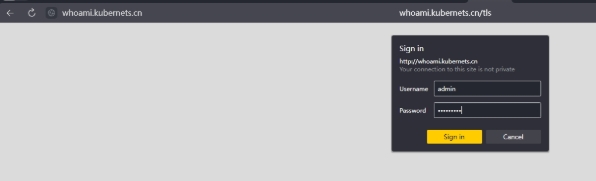
页面访问:
浏览器中输入whoami.example.com,账号为admin,密码为<basic-auth-password>