

一、前言
在本模块中,我们将部署名为Online Boutique的微服务应用程序,试用 Istio 的不同功能。
Online Boutique 是一个云原生微服务演示应用程序。Online Boutique 是一个由 10 个微服务组成的应用。
该应用是一个基于 Web 的电子商务应用,用户可以浏览商品,将其添加到购物车,并购买商品。
二、部署管理online Boutique
2.1 创建ns及启用自动注入
创建命名空间:online-boutique,设置 istio-injection=enabled 标签,启用 sidecar 自动注入。
#创建命名空间online-boutique
[root@master01 10]# kubectl create ns online-boutique

#让命名空间online-boutique启用sidecar 自动注入
[root@master01 10]# kubectl label ns online-boutique istio-injection=enabled

#验证
[root@master01 10]# kubectl get ns -l istio-injection --show-labels
2.2 使用git克隆代码仓库
#当前版本中pod未使用grpc通讯!! 最新版本0.8.0
[root@master01 ~]# cd /root/10/istioyaml/
[root@master01 istioyaml]# mkdir online-boutique && cd online-boutique/

#当前版本中pod未使用grpc通讯!! 最新版本0.8.0
##在线安装
[root@master01 istioyaml]# git clone -b v0.10.2 https://github.com/GoogleCloudPlatform/microservices-demo
##离线安装
[root@master01 online-boutique]# tar xf microservices-demo-0.10.2.tar.gz
2.3 部署管理
前往 microservices-demo 目录,istio-manifests.yaml,kubernetes-manifests.yaml是主要的安装文件
#项目需要13个镜像,gcr.io表示是Google的镜像
[root@master01 online-boutique]# cd microservices-demo-0.10.2/release/
[root@master01 release]# vim replace_image.sh
#!/bin/bash
##############################################################
# File Name:replace_image.sh
# Version:V1.0
# Author:oldboy zq
# Organization:www.zhang-qing.com
# Desc:
##############################################################
#!/bin/bash

# 定义旧镜像和新镜像的数组
old_images=(
  "us-central1-docker.pkg.dev/google-samples/microservices-demo/emailservice:v0.10.2"
  "us-central1-docker.pkg.dev/google-samples/microservices-demo/checkoutservice:v0.10.2"
  "us-central1-docker.pkg.dev/google-samples/microservices-demo/recommendationservice:v0.10.2"
  "us-central1-docker.pkg.dev/google-samples/microservices-demo/frontend:v0.10.2"
  "us-central1-docker.pkg.dev/google-samples/microservices-demo/paymentservice:v0.10.2"
  "us-central1-docker.pkg.dev/google-samples/microservices-demo/productcatalogservice:v0.10.2"
  "us-central1-docker.pkg.dev/google-samples/microservices-demo/cartservice:v0.10.2"
  "redis:alpine"
  "busybox:latest"
  "us-central1-docker.pkg.dev/google-samples/microservices-demo/loadgenerator:v0.10.2"
  "us-central1-docker.pkg.dev/google-samples/microservices-demo/currencyservice:v0.10.2"
  "us-central1-docker.pkg.dev/google-samples/microservices-demo/shippingservice:v0.10.2"
  "us-central1-docker.pkg.dev/google-samples/microservices-demo/adservice:v0.10.2"
)

new_images=(
  "registry.cn-hangzhou.aliyuncs.com/github_images1024/emailservice:v0.10.2"
  "registry.cn-hangzhou.aliyuncs.com/github_images1024/checkoutservice:v0.10.2"
  "registry.cn-hangzhou.aliyuncs.com/github_images1024/recommendationservice:v0.10.2"
  "registry.cn-hangzhou.aliyuncs.com/github_images1024/frontend:v0.10.2"
  "registry.cn-hangzhou.aliyuncs.com/github_images1024/paymentservice:v0.10.2"
  "registry.cn-hangzhou.aliyuncs.com/github_images1024/productcatalogservice:v0.10.2"
  "registry.cn-hangzhou.aliyuncs.com/github_images1024/cartservice:v0.10.2"
  "registry.cn-hangzhou.aliyuncs.com/github_images1024/redis:alpine"
  "registry.cn-hangzhou.aliyuncs.com/github_images1024/busybox:latest"
  "registry.cn-hangzhou.aliyuncs.com/github_images1024/loadgenerator:v0.10.2"
  "registry.cn-hangzhou.aliyuncs.com/github_images1024/currencyservice:v0.10.2"
  "registry.cn-hangzhou.aliyuncs.com/github_images1024/shippingservice:v0.10.2"
  "registry.cn-hangzhou.aliyuncs.com/github_images1024/adservice:v0.10.2"
)

# 遍历旧镜像数组并进行替换
for i in "${!old_images[@]}"; do
  old_image="${old_images[$i]}"
  new_image="${new_images[$i]}"
  # 使用 sed 进行替换
  sed -i "s|$old_image|$new_image|g" kubernetes-manifests.yaml
done

#执行脚本,替换镜像为国内镜像
[root@master01 release]# bash replace_image.sh
应用创建:
[root@master01 release]# kubectl apply -f kubernetes-manifests.yaml -n online-boutique
检查所有pod是否都在运行
[root@master01 release]# kubectl get pod  -n online-boutique
NAME                                     READY   STATUS    RESTARTS   AGE
adservice-6864c9b4b-rjvm9                2/2     Running   0          3m46s
cartservice-5848f5d787-q5twx             2/2     Running   0          3m47s
checkoutservice-55d8bf8446-mgkx4         2/2     Running   0          3m48s
currencyservice-5bf9cf7bc4-2tdkh         2/2     Running   0          3m46s
emailservice-6cd5684dfd-pd6df            2/2     Running   0          3m48s
frontend-6f669fd987-lzg84                2/2     Running   0          3m47s
loadgenerator-857957f844-dpl7f           2/2     Running   0          3m47s
paymentservice-65b99bc666-pdzz9          2/2     Running   0          3m47s
productcatalogservice-5bbdf959db-z5lp9   2/2     Running   0          3m47s
recommendationservice-696b5dc544-gdwfv   2/2     Running   0          3m47s
redis-cart-5f58bfdf7d-pd685              2/2     Running   0          3m47s
shippingservice-5969f947f6-r5vkf         2/2     Running   0          3m46s
创建 Istio 资源:
[root@master01 ~]# cd /root/10/istioyaml/online-boutique/microservices-demo-0.10.2

[root@master01 microservices-demo-0.10.2]# kubectl apply -f ./istio-manifests -n online-boutique

# 验证vs
[root@master01 microservices-demo-0.10.2]# kg vs -n online-boutique
NAME               GATEWAYS               HOSTS                                    AGE
frontend                                  ["frontend.default.svc.cluster.local"]   64s
frontend-ingress   ["frontend-gateway"]   ["*"]                                    64s

# 验证gw
[root@master01 microservices-demo-0.10.2]# kg gw -n online-boutique
NAME               AGE
frontend-gateway   2m8s
部署了一切后,我们就可以得到入口网关的 IP 地址并打开前端服务:
[root@master01 microservices-demo-0.10.2]# INGRESS_HOST="$(kubectl -n istio-system get service istio-ingressgateway -o jsonpath='{.status.loadBalancer.ingress[0].ip}')"

# 查看网关地址
[root@master01 microservices-demo-0.10.2]# echo $INGRESS_HOST
10.0.0.12

# 查看svc
[root@master01 microservices-demo-0.10.2]# kubectl get service -n istio-system istio-ingressgateway -o wide
NAME                   TYPE           CLUSTER-IP        EXTERNAL-IP   PORT(S)                                                                      AGE     SELECTOR
istio-ingressgateway   LoadBalancer   192.168.149.121   10.0.0.12     15021:31360/TCP,80:31978/TCP,443:31805/TCP,31400:30191/TCP,15443:30922/TCP   2d12h   app=istio-ingressgateway,istio=ingressgateway
在浏览器中打开 INGRESS_HOST ,你会看到前端服务,浏览器访问 http://10.0.0.12,如下图所示:

我们需要做的最后一件事是删除 frontend-external 服务。 frontend-external 服务是一个 LoadBalancer 服务,它暴露了前端。由于我们正在使用 Istio 的入口网关,我们不再需要这个 LoadBalancer 服务了。
删除frontend-external服务,运行:
[root@master01 microservices-demo-0.10.2]# kubectl delete svc frontend-external -nonline-boutique
三、拓扑展示
打开 kiali 在online-boutique命名空间点击Graph,查看服务的拓扑结构:

该图向我们展示了服务的拓扑结构,并将服务的通信方式可视化。它还显示了入站和出站的指标,以及通过连接 zipkin 和 Grafana(如果安装了)的追踪。
图中的颜色代表服务网格的健康状况。红色或橙色的节点可能需要注意。组件之间的边的颜色代表这些组件之间的请求的健康状况。
节点形状表示组件的类型,如服务、工作负载或应用程序。
四、流量路由
需求:流量按照不同的版本进行 weight 层面的权重分发。
删除现有的前端部署:
[root@master01 istio-manifests]# kubectl delete deploy frontend -nonline-boutique
重新创建一个前端deploy,名字还是frontend,但是指定了一个版本标签设置为original :
[root@master01 online-boutique]# cd /root/10/istioyaml/
[root@master01 istioyaml]# vim frontend-original.yaml
apiVersion: apps/v1
kind: Deployment
metadata:
  name: frontend
spec:
  selector:
    matchLabels:
      app: frontend
      version: original
  template:
    metadata:
      labels:
        app: frontend
        version: original
      annotations:
        sidecar.istio.io/rewriteAppHTTPProbers: "true"
    spec:
      containers:
        - name: server
          image: registry.cn-hangzhou.aliyuncs.com/github_images1024/frontend:v0.2.1
          ports:
          - containerPort: 8080
          readinessProbe:
            initialDelaySeconds: 10
            httpGet:
              path: "/_healthz"
              port: 8080
              httpHeaders:
              - name: "Cookie"
                value: "shop_session-id=x-readiness-probe"
          livenessProbe:
            initialDelaySeconds: 10
            httpGet:
              path: "/_healthz"
              port: 8080
              httpHeaders:
              - name: "Cookie"
                value: "shop_session-id=x-liveness-probe"
          env:
          - name: PORT
            value: "8080"
          - name: PRODUCT_CATALOG_SERVICE_ADDR
            value: "productcatalogservice:3550"
          - name: CURRENCY_SERVICE_ADDR
            value: "currencyservice:7000"
          - name: CART_SERVICE_ADDR
            value: "cartservice:7070"
          - name: RECOMMENDATION_SERVICE_ADDR
            value: "recommendationservice:8080"
          - name: SHIPPING_SERVICE_ADDR
            value: "shippingservice:50051"
          - name: CHECKOUT_SERVICE_ADDR
            value: "checkoutservice:5050"
          - name: AD_SERVICE_ADDR
            value: "adservice:9555"
          - name: ENV_PLATFORM
            value: "gcp"
          resources:
            requests:
              cpu: 100m
              memory: 64Mi
            limits:
              cpu: 200m
              memory: 128Mi
创建deploy:
# 部署如上新创建的frontend前端项目
[root@master01 istioyaml]# kubectl apply -f frontend-original.yaml -nonline-boutique

# 验证
[root@master01 istioyaml]# kubectl get pod -nonline-boutique | grep frontend
frontend-7f99c9b4bb-qmjg4                2/2     Running   0          33s
现在我们准备创建一个 DestinationRule,定义两个版本的前端——现有的( original )和新的( v1 ):
[root@master01 istioyaml]# vim frontend-dr.yaml
apiVersion: networking.istio.io/v1alpha3
kind: DestinationRule
metadata:
  name: frontend
spec:
  host: frontend.online-boutique.svc.cluster.local
  subsets:
    - name: original
      labels:
        version: original
    - name: v1
      labels:
        version: 1.0.0
创建DestinationRule:
# 应用
[root@master01 istioyaml]# kubectl apply -f frontend-dr.yaml -nonline-boutique

# 验证
[root@master01 istioyaml]# kubectl get destinationrule -nonline-boutique
NAME       HOST                                         AGE
frontend   frontend.online-boutique.svc.cluster.local   5s
接下来,我们将更新 VirtualService,并指定将所有流量路由到子集。在这种情况下,我们将把所有流量路由到原始版本original的前端。
[root@master01 istioyaml]# vim frontend-vs.yaml
apiVersion: networking.istio.io/v1alpha3
kind: VirtualService
metadata:
  name: frontend-ingress
spec:
  hosts:
    - '*'
  gateways:
    - frontend-gateway
  http:
  - route:
    - destination:
        host: frontend.online-boutique.svc.cluster.local
        port:
          number: 80
        subset: original
更新 VirtualService 资源:
[root@master01 istioyaml]# kubectl apply -f frontend-vs.yaml -nonline-boutique

# 验证
[root@master01 istioyaml]# kubectl get vs -nonline-boutique
NAME               GATEWAYS               HOSTS                                    AGE
frontend                                  ["frontend.default.svc.cluster.local"]   47m
frontend-ingress   ["frontend-gateway"]   ["*"]                                    47m

# 修改frontend这个virtualservice的hosts为frontend.online-boutique.svc.cluster.local
[root@master01 istioyaml]# kubectl edit vs.networking.istio frontend -nonline-boutique
...
...
  hosts:
  - frontend.online-boutique.svc.cluster.local
...
...

# 验证查看,观察到HOSTS已修改为frontend.online-boutique.svc.cluster.local
[root@master01 istioyaml]# kubectl get vs.networking.istio -nonline-boutique
NAME               GATEWAYS               HOSTS                                            AGE
frontend                                  ["frontend.online-boutique.svc.cluster.local"]   50m
frontend-ingress   ["frontend-gateway"]   ["*"]                                            50m
建新的前端部署:
[root@master01 istioyaml]# vim frontend-v1.yaml
apiVersion: apps/v1
kind: Deployment
metadata:
  name: frontend-v1
spec:
  selector:
    matchLabels:
      app: frontend
      version: 1.0.0
  template:
    metadata:
      labels:
        app: frontend
        version: 1.0.0
      annotations:
        sidecar.istio.io/rewriteAppHTTPProbers: "true"
    spec:
      containers:
        - name: server
          image: registry.cn-hangzhou.aliyuncs.com/github_images1024/boutique-frontend:1.0.0
          ports:
          - containerPort: 8080
          readinessProbe:
            initialDelaySeconds: 10
            httpGet:
              path: "/_healthz"
              port: 8080
              httpHeaders:
              - name: "Cookie"
                value: "shop_session-id=x-readiness-probe"
          livenessProbe:
            initialDelaySeconds: 10
            httpGet:
              path: "/_healthz"
              port: 8080
              httpHeaders:
              - name: "Cookie"
                value: "shop_session-id=x-liveness-probe"
          env:
          - name: PORT
            value: "8080"
          - name: PRODUCT_CATALOG_SERVICE_ADDR
            value: "productcatalogservice:3550"
          - name: CURRENCY_SERVICE_ADDR
            value: "currencyservice:7000"
          - name: CART_SERVICE_ADDR
            value: "cartservice:7070"
          - name: RECOMMENDATION_SERVICE_ADDR
            value: "recommendationservice:8080"
          - name: SHIPPING_SERVICE_ADDR
            value: "shippingservice:50051"
          - name: CHECKOUT_SERVICE_ADDR
            value: "checkoutservice:5050"
          - name: AD_SERVICE_ADDR
            value: "adservice:9555"
          - name: ENV_PLATFORM
            value: "gcp"
          resources:
            requests:
              cpu: 100m
              memory: 64Mi
            limits:
              cpu: 200m
              memory: 128Mi
创建前端部署frontend-v1:
[root@master01 istioyaml]# kubectl apply -f frontend-v1.yaml -nonline-boutique

#deploy正常运行
[root@master01 istioyaml]# kubectl get deploy -nonline-boutique | grep frontend-v1
frontend-v1             1/1     1            1           38s

#pod正常运行
[root@master01 istioyaml]# kubectl get pod -nonline-boutique | grep frontend-v1
frontend-v1-59d86f44b9-r292f             2/2     Running   0          55s
如果我们在浏览器中打开 INGRESS_HOST ,我们仍然会看到原始版本的前端。浏览器打开 http://10.0.0.12/,显示的前端如下:

让我们更新 VirtualService 中的权重,开始将 30% 的流量路由到 v1 的子集。
[root@master01 istioyaml]# vim frontend-30.yaml
apiVersion: networking.istio.io/v1alpha3
kind: VirtualService
metadata:
  name: frontend-ingress
spec:
  hosts:
    - '*'
  gateways:
    - frontend-gateway
  http:
  - route:
    - destination:
        host: frontend.online-boutique.svc.cluster.local
        port:
          number: 80
        subset: original
      weight: 70
    - destination:
        host: frontend.online-boutique.svc.cluster.local
        port:
          number: 80
        subset: v1
      weight: 30
更新 VirtualService:
# 应用
[root@master01 istioyaml]# kubectl apply -f frontend-30.yaml -n online-boutique

# 验证
[root@master01 istioyaml]# kubectl get vs.networking.istio -n online-boutique
NAME               GATEWAYS               HOSTS                                            AGE
frontend                                  ["frontend.online-boutique.svc.cluster.local"]   57m
frontend-ingress   ["frontend-gateway"]   ["*"]                                            57m
浏览器访问 http://10.0.0.12/,查看前端界面,如果我们刷新几次网页,我们会注意到来自前端 v1 的更新标头,一般显示$75,如下所示:

多刷新几次页面显示$30,如下所示:

我们可以在浏览器中打开 http://kiali-istio.zhang-qing.com/,进入 kiali界面查看服务的拓扑结构,选择online-boutique命名空间,查看Graph

五、故障注入
我们将为推荐服务引入 5 秒的延迟。Envoy 将为 50% 的请求注入延迟。
[root@master01 istioyaml]# vim recommendation-delay.yaml
apiVersion: networking.istio.io/v1alpha3
kind: VirtualService
metadata:
  name: recommendationservice
spec:
  hosts:
  - recommendationservice.online-boutique.svc.cluster.local
  http:
  - route:
      - destination:
          host: recommendationservice.online-boutique.svc.cluster.local
    fault:
      delay:
        percentage:
          value: 50
        fixedDelay: 5s
将上述 YAML 保存为 recommendation-delay.yaml ,然后用 kubectl apply -f recommendation-delay.yaml 创建 VirtualService。
# 应用
[root@master01 istioyaml]# kubectl apply -f recommendation-delay.yaml -n online-boutique

# 验证查看
[root@master01 istioyaml]# kubectl get vs.networking.istio -n online-boutique | grep recommendationservice
recommendationservice                          ["recommendationservice.online-boutique.svc.cluster.local"]   47s
我们可以在浏览器中打开 INGRESS_HOST http://10.0.0.12/,然后点击其中一个产品。
推荐服务的结果显示在屏幕底部的 ”Other Products You Might Light“部分。
如果我们刷新几次页面,我们会注意到,该页面要么立即加载,要么有一个延迟加载页面。这个延迟是由于我们注入了 5 秒的延迟。
我们可以打开 Grafana 和 Istio 服务仪表板:
http://grafana-istio.zhang-qing.com/ 点击 istio-service-dashboard 进入istio服务界面:

同样地,我们可以注入一个中止。在下面的例子中,我们为发送到产品目录服务的 50%的请求注入一个 HTTP 500。
[root@master01 istioyaml]# vim productcatalogservice-abort.yaml
apiVersion: networking.istio.io/v1alpha3
kind: VirtualService
metadata:
  name: productcatalogservice
spec:
  hosts:
  - productcatalogservice.online-boutique.svc.cluster.local
  http:
  - route:
      - destination:
          host: productcatalogservice.online-boutique.svc.cluster.local
    fault:
      abort:
        percentage:
          value: 50
        httpStatus: 500
创建VirtualService:
# 应用
[root@master01 istioyaml]# kubectl apply -f productcatalogservice-abort.yaml -n online-boutique

# 验证
[root@master01 istioyaml]# kubectl get vs.networking.istio -n online-boutique | grep productcatalogservice
productcatalogservice                          ["productcatalogservice.online-boutique.svc.cluster.local"]   36s
浏览器上输入http://10.0.0.12/进行测试访问,如果我们刷新几次产品页面,我们应该得到如下图所示的错误信息:

删除productcatalogservice这个VirtualService:
# 删除名字为productcatalogservice的vs
[root@master01 istioyaml]# kubectl delete vs.networking.istio productcatalogservice -n online-boutique

# 验证查看
[root@master01 istioyaml]# kubectl get vs.networking.istio -n online-boutique
NAME                    GATEWAYS               HOSTS                                                         AGE
frontend                                       ["frontend.online-boutique.svc.cluster.local"]                78m
frontend-ingress        ["frontend-gateway"]   ["*"]                                                         6m53s
recommendationservice                          ["recommendationservice.online-boutique.svc.cluster.local"]   14m
六、弹性
为了演示弹性功能,我们将在产品目录服务部署中添加一个 名为 EXTRA_LATENCY 的环境变量。这个变量会在每次调用服务时注入一个额外的休眠。
通过运行 kubectl edit deploy productcatalogservice -n online-boutique 来编辑产品目录服务部署。
# 验证查看
[root@master01 istioyaml]# kubectl get deploy -n online-boutique
NAME                    READY   UP-TO-DATE   AVAILABLE   AGE
adservice               1/1     1            1           86m
cartservice             1/1     1            1           86m
checkoutservice         1/1     1            1           86m
currencyservice         1/1     1            1           86m
emailservice            1/1     1            1           86m
frontend                1/1     1            1           9m17s
frontend-v1             1/1     1            1           25m
loadgenerator           1/1     1            1           86m
paymentservice          1/1     1            1           86m
productcatalogservice   1/1     1            1           86m
recommendationservice   1/1     1            1           86m
redis-cart              1/1     1            1           86m
shippingservice         1/1     1            1           86m
这将打开一个编辑器。滚动到有环境变量的部分,添加 EXTRA_LATENCY 环境变量。
# 修改内容
[root@master01 istioyaml]# kubectl edit deploy productcatalogservice -n online-boutique

## 在第39行env下面添加下面内容
        - name: EXTRA_LATENCY
          value: 6s
输入wq保存并退出编辑器。
如果我们刷新 http://10.0.0.12/ 页面,我们会发现页面需要6 秒的时间来加载(那是由于我们注入的延迟)。
让我们给产品目录服务添加一个 2 秒的超时。
[root@master01 istioyaml]# vim productcatalogservice-timeout.yaml
apiVersion: networking.istio.io/v1alpha3
kind: VirtualService
metadata:
  name: productcatalogservice
spec:
  hosts:
  - productcatalogservice.online-boutique.svc.cluster.local
  http:
  - route:
    - destination:
        host: productcatalogservice.online-boutique.svc.cluster.local
    timeout: 2s
创建 VirtualService。
# 应用
[root@master01 istioyaml]# kubectl apply -f productcatalogservice-timeout.yaml -n online-boutique

# 验证
[root@master01 istioyaml]# kubectl get vs.networking.istio -n online-boutique | grep productcatalogservice
productcatalogservice                          ["productcatalogservice.online-boutique.svc.cluster.local"]   17s
如果我们刷新页面 http://10.0.0.12/,我们会注意到一个错误信息的出现:

该错误表明对产品目录服务的请求超时了。
原因为:我们修改了服务,增加了 6 秒的延迟,并将超时设置为 2 秒。
让我们定义一个 重试策略,有三次尝试,每次尝试的超时为 1 秒。
[root@master01 istioyaml]# vim productcatalogservice-retry.yaml
apiVersion: networking.istio.io/v1alpha3
kind: VirtualService
metadata:
  name: productcatalogservice
spec:
  hosts:
  - productcatalogservice.online-boutique.svc.cluster.local
  http:
  - route:
    - destination:
        host: productcatalogservice.online-boutique.svc.cluster.local
    retries:
      attempts: 3
      perTryTimeout: 1s
部署验证:
# 部署
[root@master01 istioyaml]# kubectl apply -f productcatalogservice-retry.yaml -n online-boutique

# 验证
[root@master01 istioyaml]# kubectl get vs.networking.istio -n online-boutique | grep productcatalogservice
productcatalogservice                          ["productcatalogservice.online-boutique.svc.cluster.local"]   2m21s
由于我们在产品目录服务部署中留下了额外的延迟,我们仍然会看到错误。

让我们打开 Zipkin 中的追踪,看看重试策略的作用。使用如下方法打开zipkin界面:
http://zipkin-istio.zhang-qing.com/zipkin/
点击 + 按钮,选择 serviceName=frontend.online-boutique和minDuration=1s 。为了只得到至少一秒钟的响应(这就是我们的 perTryTimeout ),选择 minDuration ,在文本框中输入1s。点击 RUN QUERY 搜索按钮,显示所有追踪。
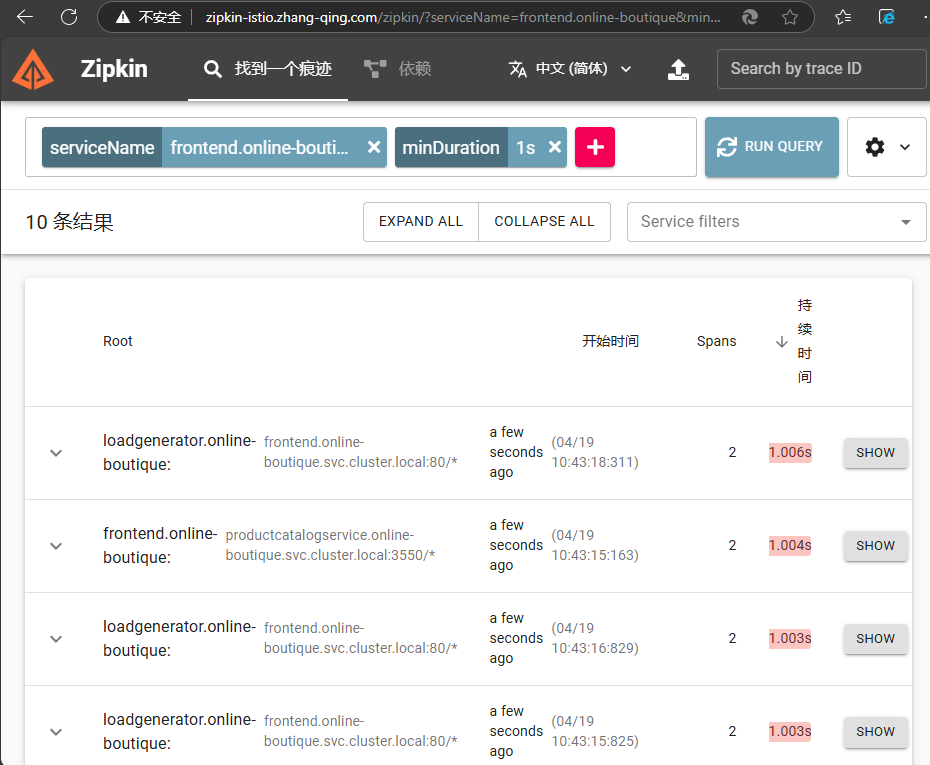
点击 Filter 按钮,从下拉菜单中选择 productCatalogService.online-boutique 。你应该看到花了 1 秒钟的 trace。这些 trace 对应于我们之前定义的 perTryTimeout 。

详细信息如下:

运行 kubectl delete vs.networking.istio productcatalogservice 删除VirtualService
# 验证查看
[root@master01 istioyaml]# kubectl get vs.networking.istio -n online-boutique
NAME                    GATEWAYS               HOSTS                                                         AGE
frontend                                       ["frontend.online-boutique.svc.cluster.local"]                94m
frontend-ingress        ["frontend-gateway"]   ["*"]                                                         23m
productcatalogservice                          ["productcatalogservice.online-boutique.svc.cluster.local"]   8m41s
recommendationservice                          ["recommendationservice.online-boutique.svc.cluster.local"]   30m

# 删除vs
[root@master01 istioyaml]# kubectl delete vs.networking.istio productcatalogservice -n online-boutique

# 再次验证查看
[root@master01 istioyaml]# kubectl get vs.networking.istio -n online-boutique
NAME                    GATEWAYS               HOSTS                                                         AGE
frontend                                       ["frontend.online-boutique.svc.cluster.local"]                94m
frontend-ingress        ["frontend-gateway"]   ["*"]                                                         23m
recommendationservice                          ["recommendationservice.online-boutique.svc.cluster.local"]   31m