

一、Apache APISIX 介绍

1.1 云原生 API 网关
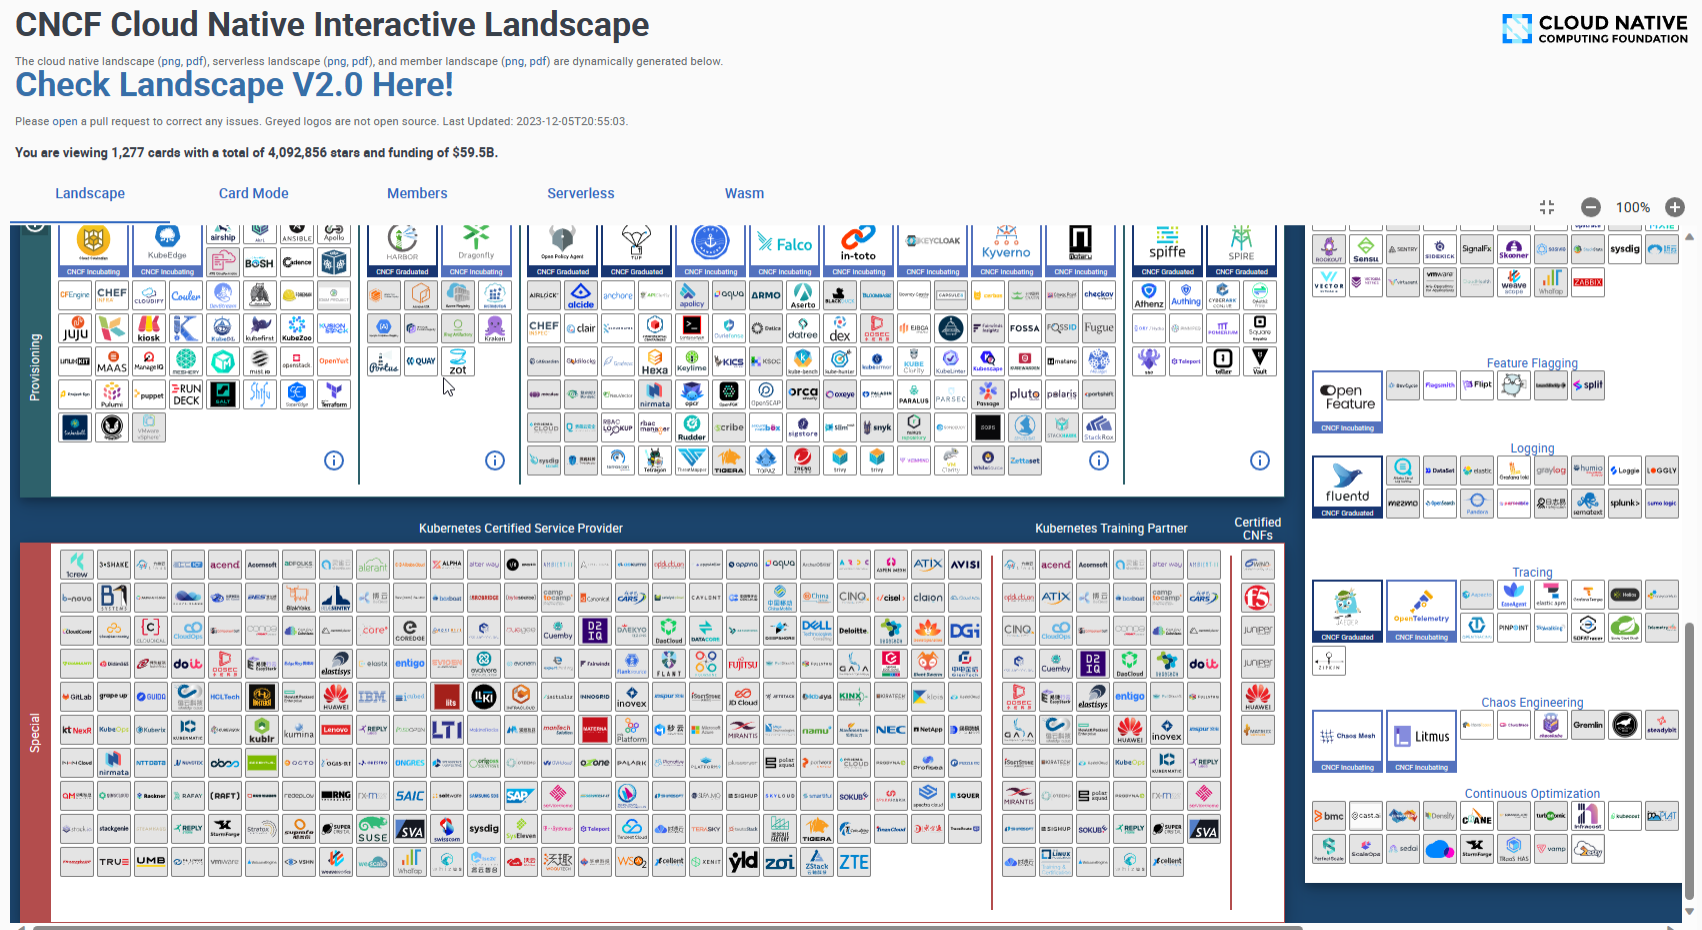
CNCF(Cloud Native Computing Foundation,云原生计算基金会) 的 API Gateway landscape 中有20多个不同的 API 网关(不包括公有云厂商产品),包括 Apache APISIX、Kong、Tyk 等
https://landscape.cncf.io https://landscape.cncf.io/card-mode?category=api-gateway&grouping=category&sort=contributors

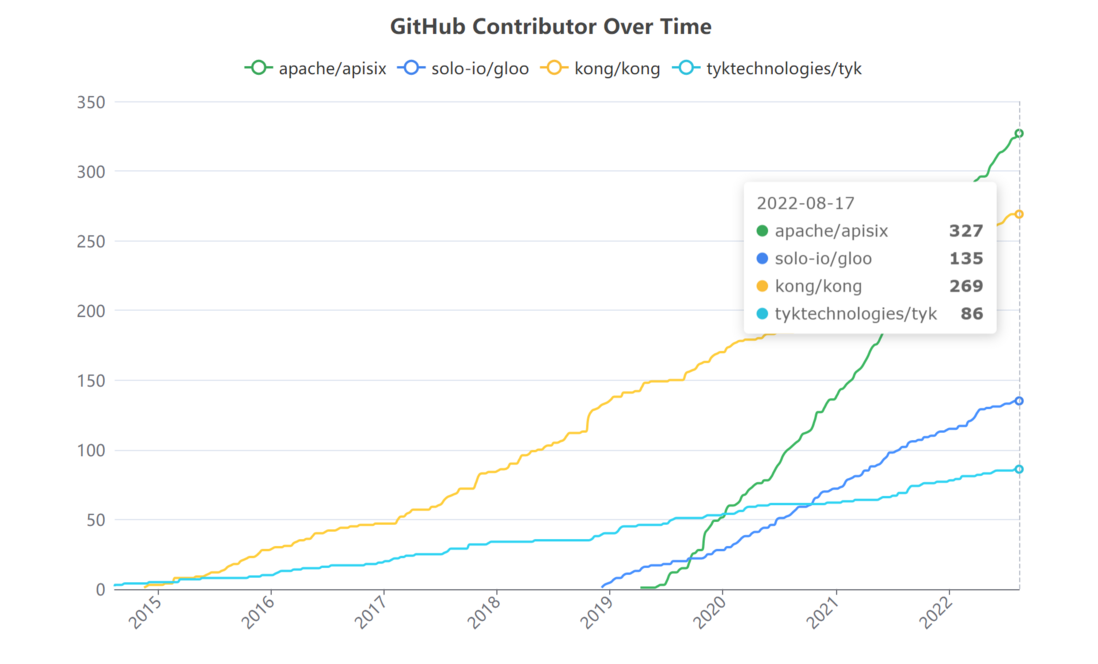
比较 4 个流行的开源云原生 API 网关Apache APISIX、Kong、Tyk 和 Gloo 对GitHub 的代码贡献者数量如下图
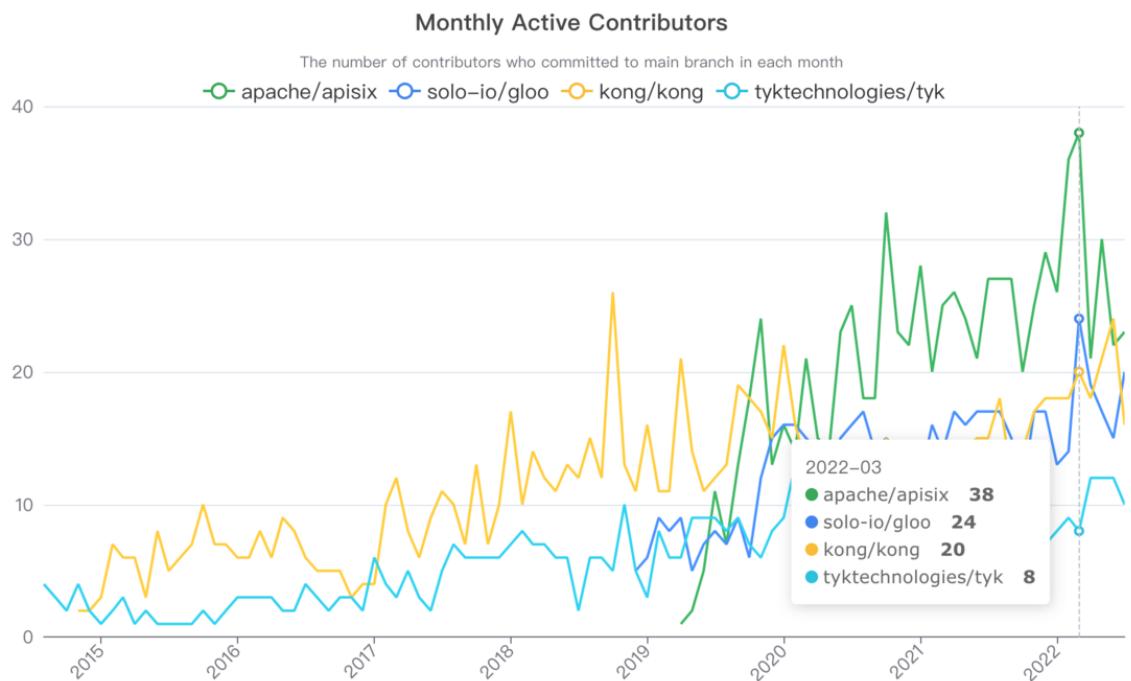
以上四个开源 API 网关的月度活跃的开发者数量如下图
1.2 APISIX 介绍
官网:
https://apisix.apache.org/
https://apisix.apache.org/zh/
https://github.com/apache/apisix
https://www.apiseven.com/

Apache APISIX 是 Apache 软件基金会下的云原生API网关
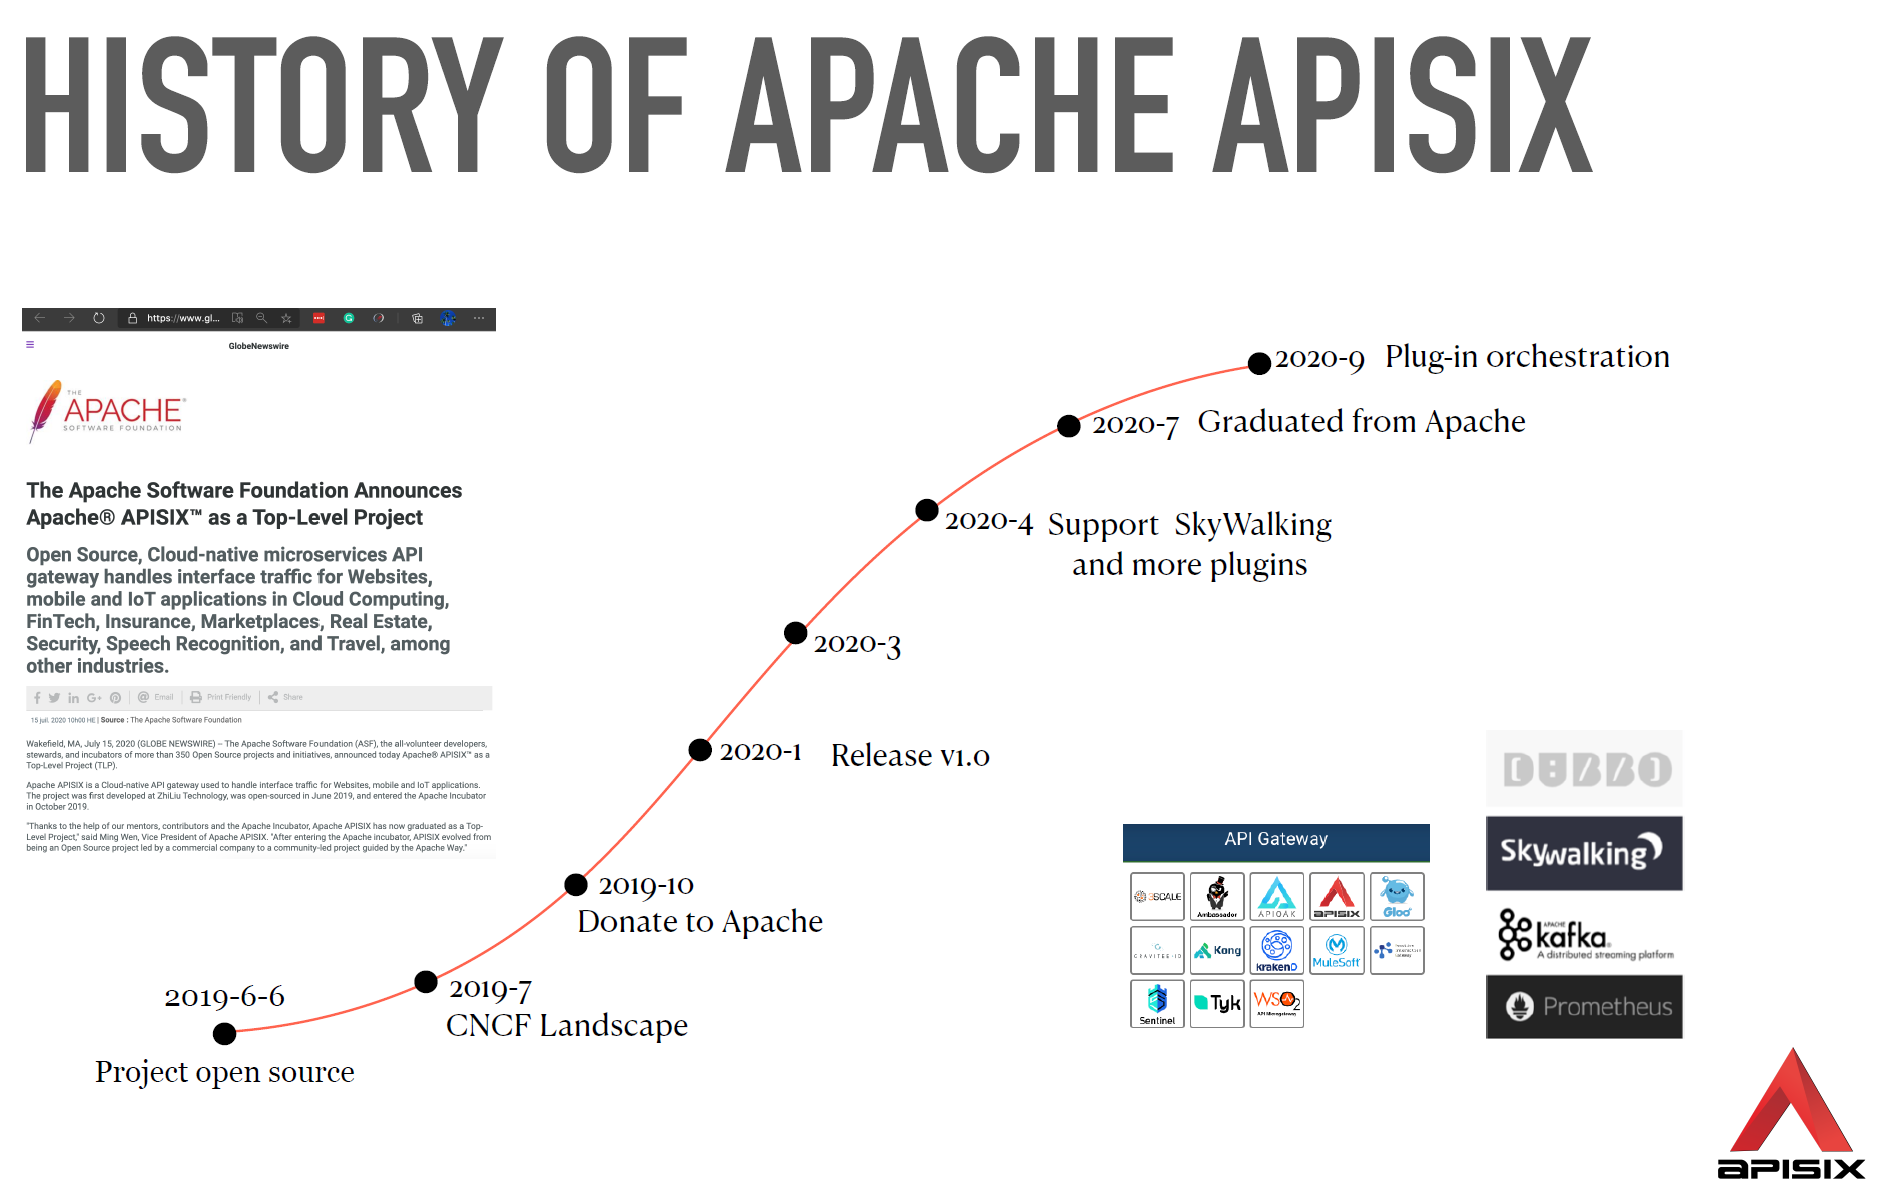
Apache APISIX 于 2019 年开源并由支流科技捐赠给 Apache 软件基金会,现已成为性能最高、 社区最活跃的开源 API 网关项目。
Apache APISIX 是中国唯一由初创公司贡献的Apache顶级项目,也是最快毕业(只用了9个月)的项目
Apache APISIX 兼具动态、实时、高性能等特点,提供了负载均衡、动态上游、灰度发布(金丝雀发布)、服务熔断、身份认证、可观测性等丰富的流量管理功能。
Apache APISIX 可以使用 Apache APISIX来处理传统的南北向流量,也可以处理服务间的东西向流量。
Apache APISIX 也支持作为Kubernetes Ingress Controller来使用。
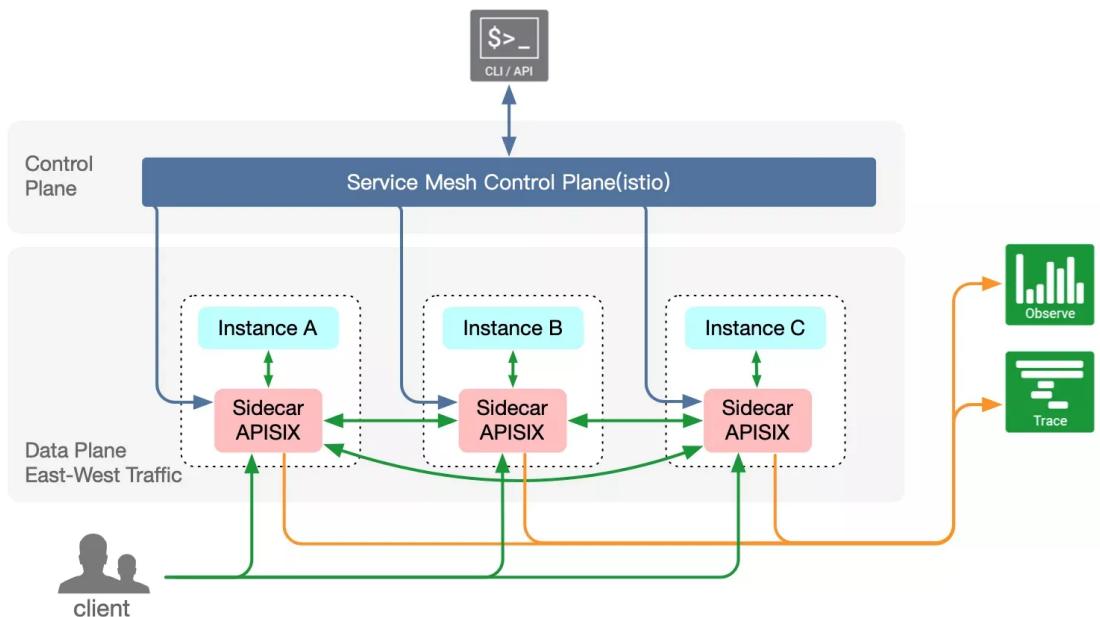
Apache APISIX 也可以在服务网格 Service Mesh 中充当类似于 Envoy 这种 SideCar的 Proxy 功能,替代 Envoy 处理服务间东西向流量
Apache APISIX 可以支持实现全流量(南北,东西)网关
Apache APISIX 可以支持 AI Agents
1.3 APISIX 主要特性
https://apisix.apache.org/zh/docs/apisix/3.2/getting-started/ Apache APISIX 使用户只需专注在具体业务中,而无需考虑 API 处理基础组件。
Apache APISIX 是首个提供低代码能力的开源 API 网关,作为 Apache 软件基金会顶级项目,避免出现Licences的商业纠纷
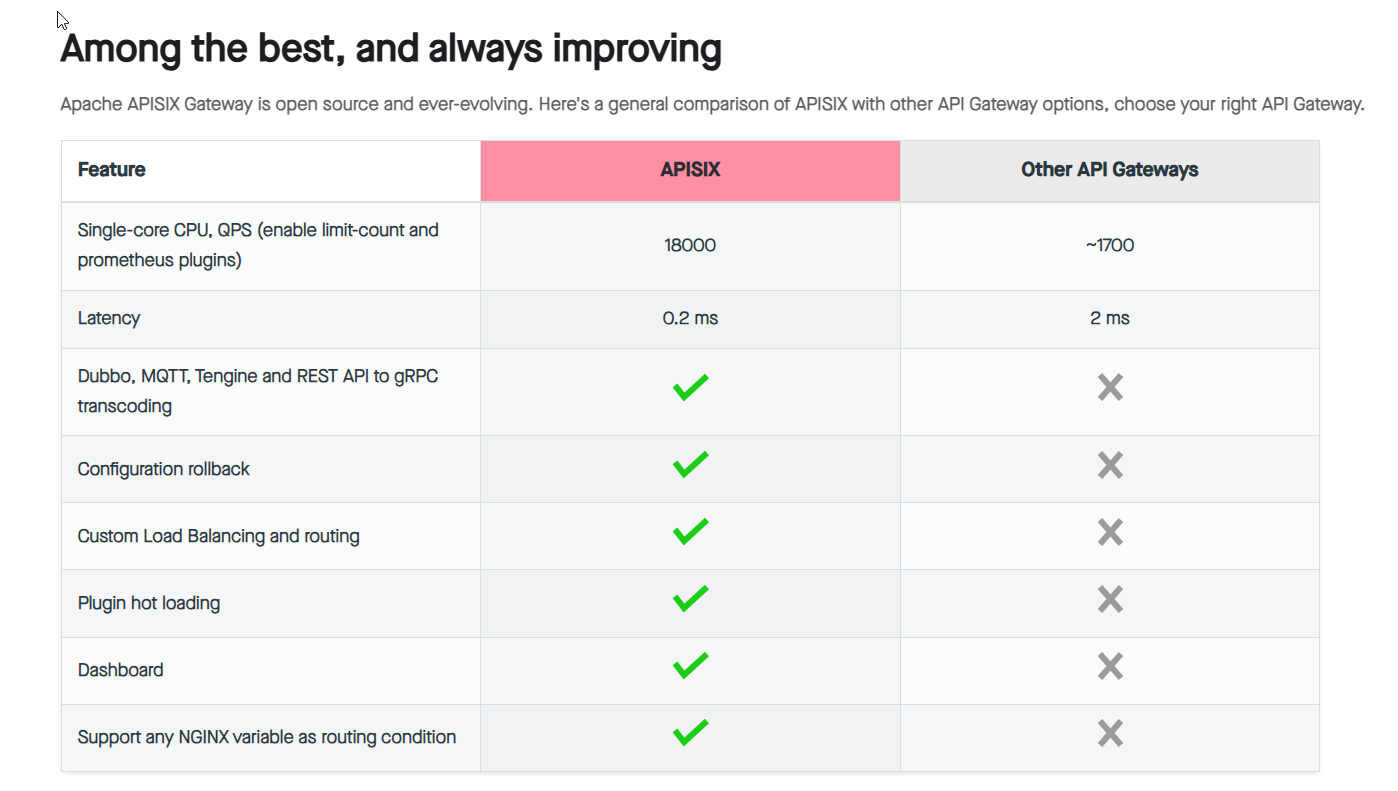
Apache APISIX 采用了基于OpenResty的架构,以及高效的Nginx引擎,能够处理更高的并发请求,响应更快的API。单核心QPS可达1.5万,延迟低于0.7ms,基于ETCD的事件驱动的配置生效时间小于1ms,相对Kong轮询拉取需要5s
APISIX 与其它API网关不同,不使用关系型数据库,而使用 etcd 作为存储,让 APISIX 在底层上更加贴合云原生,也让它在系统高可用和性能带来了更多优势
多平台支持: APISIX提供了多平台解决方案,它不但支持裸机运行,也支持在Kubernetes中使用,还支持与AWS Lambda、Azure Function、Lua 函数和Apache OpenWhisk等云服务集成。
全动态能力: APISIX支持热加载,这意味着你不需要重启服务就可以更新APISIX的配置。
精细化路由: APISIX支持使用NGINX内置变量做为路由的匹配条件,你可以自定义匹配函数来过滤请求,匹配路由。
运维友好: APISIX支持与以下工具和平台集成: Apache SkyWalking、 Consul、 Nacos、 Eureka、 HashiCorp Vault、 Zipkin, 通过APISIX Dashboard,运维人员可以通过友好且直观的UI配置APISIX。
部署更简单:APISIX提供了Docker镜像、Kubernetes Helm Chart等多种部署方式,可以快速部署APISIX。
多语言插件支持: APISIX支持多种开发语言进行插件开发,开发人员可以选择擅长语言的SDK开发自定义插件。当前支持80多种插件,覆盖各种功能包括;身份认证、安全、日志、可观测性...
开源社区更活跃:APISIX由Apache APISIX社区维护,有着广泛的用户和贡献者社区,提供了更加完善的文档和支持。
1.4 APISIX 的应用场景
https://apisix.apache.org/blog/2022/07/30/why-we-need-apache-apisix/#apisix-application-scenario APISIX的核心是高性能代理服务,自身不绑定任何环境属性。当它演变为Ingress、服务网格等产品时,都是外部服务与APISIX配合,变化的是外部程序而不是APISIX自身,下面将逐步为大家介绍APISIX是如何支持这些场景的。
Apache APISIX 可以支持实现全流量(南北,东西)网关

Load Balancer and API Gateway
第一个是传统的LB和API网关场景。 由于APISIX是基于NGINX $^ +$ LuaJIT实现的,因此具有高性能、安全性等特点,同时还支持动态SSL证书卸载、SSL握手优化等功能。
在负载均衡服务方面,也表现得更好。 从NGINX切换到APISIX不会降低性能,还能享受动态统一管理等特性带来的管理效率提升。
Microservice Gateway
APISIX目前支持多种语言扩展插件的编写,可以解决东西向微服务API网关面临的主要问题——异构多语言和通用问题。
内置支持的服务注册中心有Nacos、etcd、Eureka等,以及标准的DNS方式,可以平滑替换Zuul、Spring Cloud Gateway、Dubbo等微服务API网关。
Kubernetes Ingress
目前K8s官方的Kubernetes Ingress Controller项目主要是基于NGINX配置文件的方式,因此在路由能力和加载方式上稍显不足,有一些明显的缺点。
例如,当添加或修改任何API时,需要重新启动服务才能完成新NGINX配置的更新,但服务的重新启动对在线流量的影响很大。
APISIX Ingress Controller完美解决了上述所有问题:支持全动态,无需重启加载。 同时继承了APISIX的所有优点,还支持原生Kubernetes CRD,方便用户迁移。
Service mesh
未来五到十年,基于云原生模型架构的Service Mesh架构将开始出现。 APISIX也开始提前锁定赛道。
经过研究和技术分析,APISIX已经支持了xDS协议,APISIX Mesh诞生了,APISIX在服务网格领域也占有一席之地。
APISIX 可以替代 Envoy 处理服务间的东西向流量
Apache APISIX 可以支持 AI Agents
1.5 APISIX 架构
https://apisix.apache.org/blog/2022/11/02/apache-apisix-v3-preview/
https://apisix.apache.org/blog/2022/07/30/why-we-need-apache-apisix/
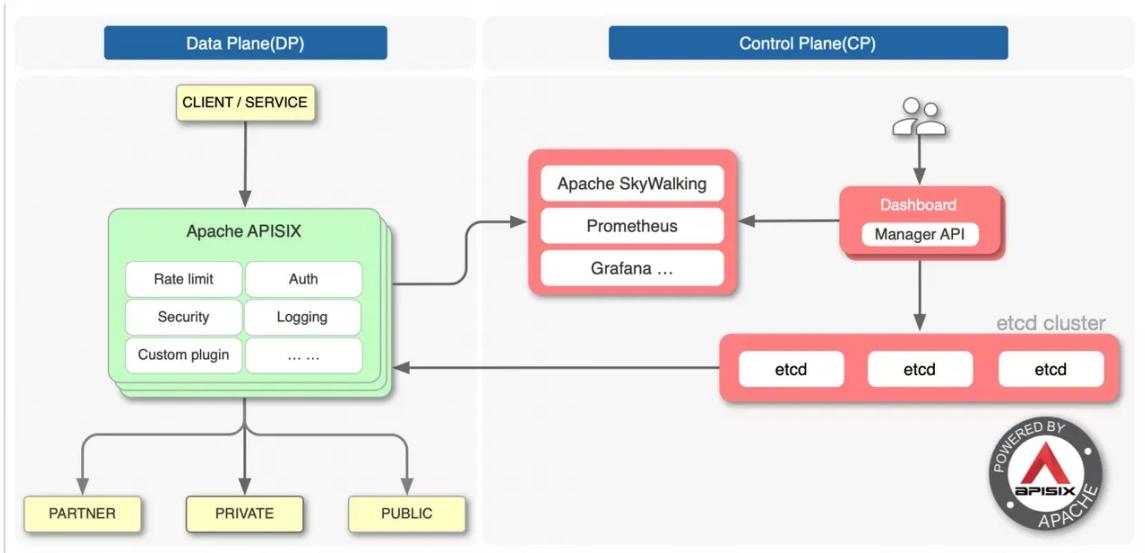
APISIX的架构主要分成两部分:
- 数据平面 Data Plane它是真正去处理来自客户端请求的一个组件,去处理用户的真实流量,包括像身份验证、证书卸载、日志分析和可观测性等功能。数据面本身并不会存储任何数据,所以它是一个无状态结构。
- 控制平面 Control Plane增加独立的控制平面(CP),将来可以支持调度所有数据平面(DP),不局限于APISIXAPISIX在底层架构上和其它API网关的一个很大不同就在于控制面。APISIX在控制面上选择使用etcd。
- AI 平面 AP未来增加AI 平面,因为仅是接入层本身没有价值,分析流动的数据并反哺业务,才有价值
1.6 APISIX的主要概念和组件
https://apisix.apache.org/zh/docs/apisix/next/tutorials/expose-api/ https://apisix.apache.org/zh/docs/apisix/3.2/getting-started/#%E4%B8%BB%E8%A6%81%E6%A6%82%E5%BF%B5
Route
Route 也称为路由,是 APISIX 中最基础和最核心的资源对象。APISIX 可以通过路由定义规则来匹配客户端请求,根据匹配结果加载并执行相应的插件,最后把请求转发给到指定的上游服务。路由中主要包含三部分内容:匹配规则、插件配置和上游信息。
Upstream
Upstream 也称为上游,上游是对虚拟主机的抽象,即应用层服务或节点的抽象。
上游的作用是按照配置规则对服务节点进行负载均衡,它的地址信息可以直接配置到路由或服务上。
当多个路由或服务引用同一个上游时,可以通过创建上游对象,在路由或服务中使用上游 ID 的方式引用上游,减轻维护压力。
服务
Service 也称为服务,是某类 API 的抽象(也可以理解为一组 Route 的抽象)。
它通常与上游服务抽象是一一对应的,Route 与 Service 之间,通常是 N:1 的关系。
Service 用于定义 API 服务的通用属性,并将其与上游( upstream )关联。它的主要功能包括:
-
路由配置: service 可以通过路由规则( route )关联,指定哪些请求会被转发到该服务。
-
插件配置:可以在service层面上配置插件,如身份认证、限流、监控等,这些插件将应用于所有通过该服务的请求。
-
上游关联:service 会引用一个upstream,定义具体的后端服务集群。
Admin API
用户可以通过 Admin API 控制 APISIX 实例。
二、APISIX 安装
2.1 安装 APISIX 方法说明
https://apisix.apache.org/docs/apisix/installation-guide/
https://apisix.apache.org/downloads/
https://github.com/apache/apisix APISIX 包括以下三个核心组件
- APISIX: 3.13 开始内置了 Dashboard
- ETCD
- APISIX Dashboard
APISIX 版本选择
https://apisix.apache.org/downloads
每个月发布一个版本
注意: 建议安装LTS版本
https://www.apiseven.com/apisix-vs-enterprise

#商业版
API7 EE 是一款专注于 API 全生命周期管理的商业产品,它以开源 API 网关 APISIX 为基础,并添加了企业级功能。
API7 EE 可以帮助企业用户优化并升级传统应用架构,以更高效、更安全的方式交付产品。
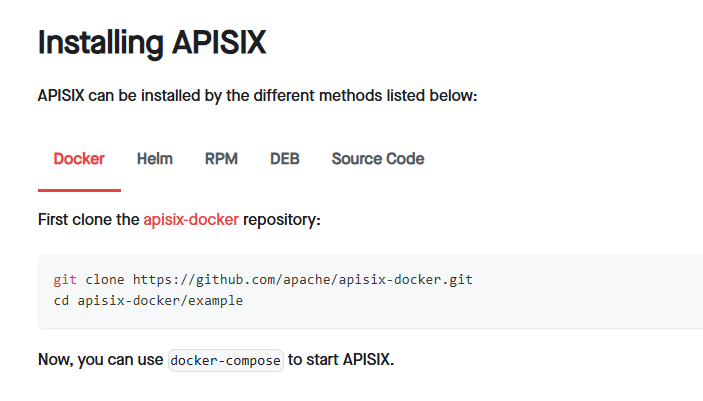
APISIX 安装方法
- 二进制包安装
- Docker
- Helm
- 源码编译
2.2 APISIX 二进制包安装
2.2.1 二进制安装 ETCD
APISIX使用etcd作为配置中心进行保存和同步配置。在安装APISIX之前,需要提前安装etcd。
https://apisix.apache.org/docs/apisix/installation-guide/#installing-etcd
范例: 安装启动 ETCD
[root@ubuntu2404 ~]#ETCD_VERSION=3.6.8
[root@ubuntu2404 ~]#ETCD_VERSION=3.6.6
[root@ubuntu2404 ~]#ETCD_VERSION=3.5.17
[root@ubuntu2404 ~]#ETCD_VERSION=3.5.16
[root@ubuntu2404 ~]#ETCD_VERSION='3.5.4'

#直接下载
[root@ubuntu2404 ~]#wget https://github.com/etcd-io/etcd/releases/download/v${ETCD_VERSION}/etcd-v${ETCD_VERSION}-linux-amd64.tar.gz

#使用国内镜像加速下载
[root@ubuntu2404 ~]#wget https://mirror.ghproxy.com/https://github.com/etcd-io/etcd/releases/download/v${ETCD_VERSION}/etcd-v${ETCD_VERSION}-linux-amd64.tar.gz

[root@ubuntu2404 ~]#tar -xvf etcd-v${ETCD_VERSION}-linux-amd64.tar.gz -C /usr/local/

#新版
[root@ubuntu2404 ~]#cd /usr/local/etcd-v${ETCD_VERSION}-linux-amd64 && cp -a etcd etcdctl etcdutl /usr/local/bin

#旧版
[root@ubuntu2404 ~]#cd /usr/local/etcd-v${ETCD_VERSION}-linux-amd64 && cp -a etcd etcdctl /usr/local/bin/

[root@ubuntu2404 ~]#etcd --version
etcd Version: 3.5.4
Git SHA: 08407ff76
Go Version: go1.16.15
Go OS/Arch: linux/amd64

#启动ETCD
[root@ubuntu2404 ~]#nohup etcd >/tmp/etcd.log 2>&1 &

#查看端口
[root@ubuntu2404 ~]#ss -ntlup|grep etcd
tcp   LISTEN 0      4096       127.0.0.1:2379      0.0.0.0:*    users:(("etcd",pid=2487,fd=8))
tcp   LISTEN 0      4096       127.0.0.1:2380      0.0.0.0:*    users:(("etcd",pid=2487,fd=7))

#service方式
[root@ubuntu2404 ~]#killall etcd
[root@ubuntu2404 ~]#cat > /lib/systemd/system/etcd.service <<EOF
[Unit]
Description=etcd
After=network-online.target
Wants=network-online.target

[Service]
ExecStart=/usr/local/bin/etcd
LimitNOFILE=65536

[Install]
WantedBy=multi-user.target
EOF

[root@ubuntu2404 ~]#systemctl daemon-reload
[root@ubuntu2404 ~]#systemctl enable --now etcd
[root@ubuntu2404 ~]#systemctl status etcd
● etcd.service - etcd
     Loaded: loaded (/usr/lib/systemd/system/etcd.service; enabled; preset: enabled)
     Active: active (running) since Wed 2025-03-12 15:44:04 CST; 1s ago
   Main PID: 1832 (etcd)
     Tasks: 7 (limit: 2214)
     Memory: 7.0M (peak: 7.5M)
       CPU: 59ms
     CGroup: /system.slice/etcd.service
2.2.2 APISIX 基于 Ubuntu 系统安装
https://apisix.apache.org/docs/apisix/installation-guide/
范例:Ubuntu 包安装 APISIX
#生成apt仓库配置,支持CPU架构amd64
[root@ubuntu2404 ~]#wget -O - http://repos.apiseven.com/pubkey.gpg | sudo apt-key add -
[root@ubuntu2404 ~]#echo "deb http://repos.apiseven.com/packages/debian bullseye main" | sudo tee /etc/apt/sources.list.d/apisix.list
#安装前查看版本
[root@ubuntu2404 ~]#apt update && apt -a list apisix
#安装指定版本
[root@ubuntu2404 ~]#apt -y install apisix=3.0.0-0
#用法帮助
[root@ubuntu2404 ~]#apisix
[root@ubuntu2404 ~]#apisix version
#初始化
[root@ubuntu2404 ~]#apisix init
#配置文件格式检查
[root@ubuntu2404 ~]#apisix test
#修改资源限制,消除告警(可选)
[root@ubuntu2404 ~]#vim /etc/security/limits.conf
root - nofile 88888
[root@ubuntu2404 ~]#reboot
[root@ubuntu2404 ~]#ulimit -n
#启动服务,注意:不要和service方式混用
[root@ubuntu2404 ~]#apisix start
#停止服务
[root@ubuntu2404 ~]#apisix stop|quit
#内置service文件内容
[root@ubuntu2404 ~]#cat /lib/systemd/system/apisix.service
[Unit]
Description=apisix
After=network-online.target
Wants=network-online.target
[Service]
Type=forking
Restart=on-failure
WorkingDirectory=/usr/local/apisix
ExecStart=/usr/bin/apisix start
ExecStop=/usr/bin/apisix stop
ExecReload=/usr/bin/apisix reload
LimitNOFILE=65536
[Install]
WantedBy=multi-user.target
#Service方式启动
[root@ubuntu2404 ~]#systemctl daemon-reload && systemctl enable --now apisix
[root@ubuntu2404 ~]#journalctl -u apisix
#监听端口
[root@ubuntu2404 ~]#ss -ntlp|grep openresty
#查看配置文件
[root@ubuntu2404 ~]#ls /usr/local/apisix
[root@ubuntu2404 ~]#ls /usr/local/apisix/conf
[root@ubuntu2404 ~]#cat /usr/local/apisix/conf/config.yaml
#确认启动
[root@ubuntu2404 ~]#curl -s "http://127.0.0.1:9080" --head | grep Server
#默认dashboard不允许远程访问,需要修改配置文件
[root@ubuntu2404 ~]#vim /usr/local/apisix/conf/config.yaml
allow_admin:
- 0.0.0.0/0
admin_key_required: true
admin_api_version: v3
[root@ubuntu2404 ~]#systemctl restart apisix
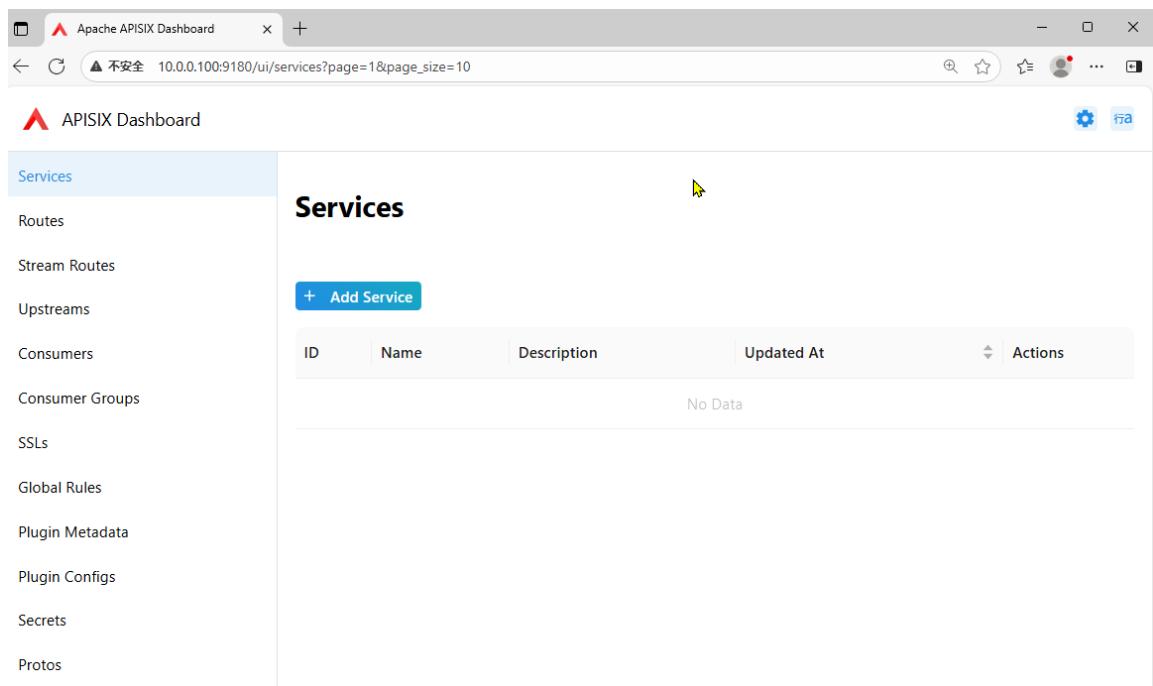
#APISIX/3.13.1以后版默认安装dashboard
#访问地址:http://10.0.0.100:9180/ui
#查看管理员密钥
[root@ubuntu2404 ~]#grep -A3 admin_key /usr/local/apisix/conf/config.yaml
admin_key_required: true
admin_api_version: v3
admin_key:
- name: admin
key: OuDzkSNxVuiKrAwANljvsZYuyKtdBcES
role: admin

2.2.3 APISIX 基于红帽系统安装
https://apisix.apache.org/docs/apisix/installation-guide/#installation-via-rpm-repository
2.2.3.1 在线RPM仓库安装
If OpenResty is not installed, you can run the command below to install both OpenResty and APISIX repositories:
sudo yum install -y https://repos.apiseven.com/packages/centos/apache-apisix-repo-1.0-1.noarch.rpm
If OpenResty is installed, the command below will install the APISIX repositories:
sudo yum-config-manager --add-repo https://repos.apiseven.com/packages/centos/apache-apisix.repo
Then, to install APISIX, run:
sudo yum install apisix
You can also install a specific version of APISIX by specifying it:
#查看版本
yum list apisix --showduplicates
sudo yum install apisix-2.13.1
范例: Rocky8 安装 APISIX
[root@rocky8 ~]#yum install -y https://repos.apiseven.com/packages/centos/apache-apisix-repo-1.0-1.noarch.rpm
[root@rocky8 ~]#yum-config-manager --add-repo https://repos.apiseven.com/packages/centos/apache-apisix.repo
[root@rocky8 ~]#yum list apisix --showduplicates
apisix.x86_64                3.0.0-0.el8                   release
apisix.x86_64                3.1.0-0.el8                   release
apisix.x86_64                3.2.0-0.el8                   release
apisix.x86_64                3.2.1-0.el8                   release
apisix.x86_64                3.2.2-0.el8                   release
apisix.x86_64                3.3.0-0.el8                   release
apisix.x86_64                3.4.0-0.el8                   release
apisix.x86_64                3.4.1-0.el8                   release
apisix.x86_64                3.5.0-0.el8                   release
.......
#安装指定版本
[root@rocky8 ~]#yum -y install apisix-3.0.0
#安装最新版本
[root@rocky8 ~]#yum -y install apisix
[root@rocky8 ~]#systemctl enable --now apisix
[root@rocky8 ~]#systemctl status - apisix
Unit -.service could not be found.
● apisix.service - apisix
   Loaded: loaded (/usr/lib/systemd/system/apisix.service; enabled; vendor preset: disabled)
   Active: active (running) since Tue 2023-11-07 14:01:22 CST; 11min ago
 Process: 24572 ExecStart=/usr/bin/apisix start (code=exited, status=0/SUCCESS)
 Main PID: 24595 (openresty)
   Tasks: 28 (limit: 11175)
   Memory: 83.8M
   CGroup: /system.slice/apisix.service
           ├─24595 nginx: master process /usr/bin/openresty -p /usr/local/apisix -c
/usr/local/apisix/conf/nginx.conf
           ├─24596 nginx: worker process
           ├─24597 nginx: worker process
           ├─24598 nginx: cache manager process
           └─24600 nginx: privileged agent process
Nov 07 14:01:22 rocky8.wang.org systemd[1]: Starting apisix...
Nov 07 14:01:22 rocky8.wang.org apisix[24572]: /usr/local/openresty/luajit/bin/luajit ./apisix/cli/apisix.lua
start
Nov 07 14:01:22 rocky8.wang.org systemd[1]: Started apisix.
[root@rocky8 ~]#ss -ntlp|grep openresty
LISTEN 0      128          0.0.0.0:9080      0.0.0.0:*   users:(("openresty",pid=24597,fd=17),
("openresty",pid=24595,fd=17))
LISTEN 0      128          0.0.0.0:9080      0.0.0.0:*   users:(("openresty",pid=24596,fd=13),
("openresty",pid=24595,fd=13))
LISTEN 0      128          0.0.0.0:9180      0.0.0.0:*   users:(("openresty",pid=24597,fd=11),
("openresty",pid=24596,fd=11),("openresty",pid=24595,fd=11))
LISTEN 0      128        127.0.0.1:9090      0.0.0.0:*   users:(("openresty",pid=24597,fd=9),
("openresty",pid=24596,fd=9),("openrest",pid=24595,fd=9))
LISTEN 0      128          0.0.0.0:9443      0.0.0.0:*   users:(("openresty",pid=24597,fd=19),
("openresty",pid=24595,fd=19))
LISTEN 0      128          0.0.0.0:9443      0.0.0.0:*   users:(("openresty",pid=24596,fd=15),
("openresty",pid=24595,fd=15))
LISTEN 0      128        127.0.0.1:9091      0.0.0.0:*   users:(("openresty",pid=24597,fd=10),
("openresty",pid=24596,fd=10),("openresty",pid=24595,fd=10))
LISTEN 0      128             [::]:9080         [::]:*   users:(("openresty",pid=24596,fd=14),
("openresty",pid=24595,fd=14))
LISTEN 0      128             [::]:9080         [::]:*   users:(("openresty",pid=24597,fd=18),
("openresty",pid=24595,fd=18))
LISTEN 0      128             [::]:9443         [::]:*   users:(("openresty",pid=24596,fd=16),
("openresty",pid=24595,fd=16))
LISTEN 0      128             [::]:9443         [::]:*   users:(("openresty",pid=24597,fd=20),
("openresty",pid=24595,fd=20))
确认启动
[root@rocky8 ~]#curl -s "http://127.0.0.1:9080" --head | grep Server: APISIX/3.0.0
2.2.3.2 离线RPM包安装
https://apisix.apache.org/docs/apisix/installation-guide/#installation-via-rpm-offline-package
First, download APISIX RPM offline package to an apisix folder:
sudo mkdir -p apisix
sudo yum install -y https://repos.apiseven.com/packages/centos/apache-apisix-repo-1.0-1.noarch.rpm
sudo yum clean all && yum makecache
sudo yum install -y --downloadonly --downloaddir=./apisix apisix
Then copy the apisix folder to the target host and run
sudo yum install ./apisix/*.rpm
2.2.3.3 启动 APISIX server
https://apisix.apache.org/docs/apisix/installation-guide/#managing-apisix-server-1)
Once APISIX is installed, you can initialize the configuration file and etcd by running
sudo apisix init
To start APISIX server, run
sudo apisix start
或者
systemctl enable --now apisix
2.3 源码编译安装 APISIX
https://apisix.apache.org/zh/docs/apisix/building-apisix/#源码安装-apisix
首先,你可以通过以下命令安装依赖项:
curl https://raw.githubusercontent.com/apache/apisix/master/utils/install-dependencies.sh -sL | bash -
然后,创建一个目录并设置环境变量 APISIX_VERSION:
APISIX_VERSION='3.5.0'
mkdir apisix-\$\{APISIX_VERSION\}
现在,你可以运行以下命令,从 Github 克隆 APISIX 源码:
git clone --depth 1 --branch ${APISIX_VERSION} https://github.com/apache/apisix.git apisix-\$\{APISIX_VERSION\}
你可以从下载页面下载源码包。但是官网的源码包缺少测试用例,可能会对你后续操作产生困扰。
另外,你也可以在该页面找到 APISIX Dashboard 和 APISIX Ingress Controller 的源码包。
然后切换到 APISIX 源码的目录,创建依赖项并安装 APISIX,命令如下所示:
cd apisix-${APISIX_VERSION}
make deps
make install
该命令将安装 APISIX 运行时依赖的 Lua 库和 apisix 命令。
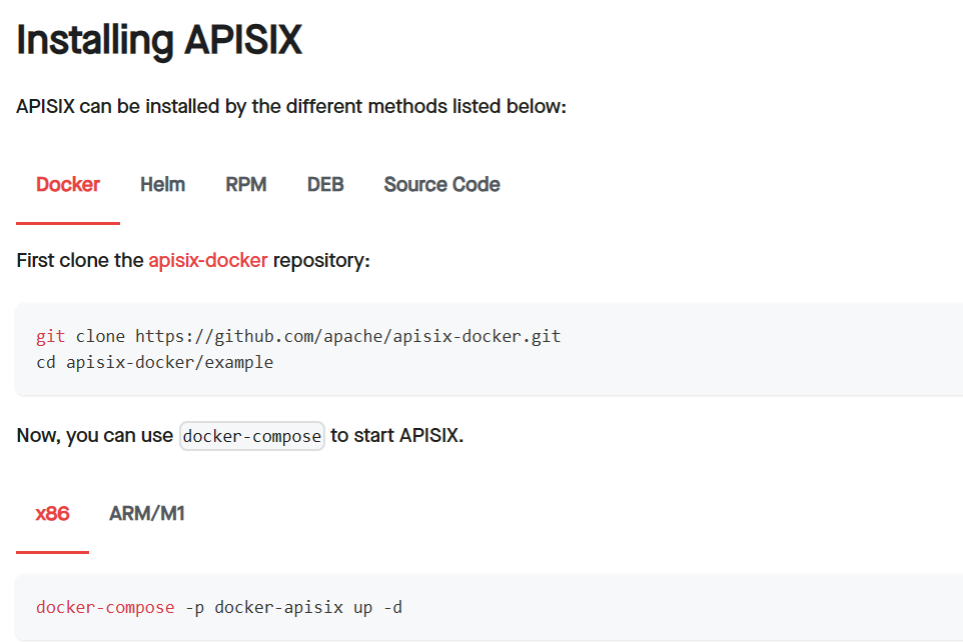
2.4 Docker 脚本安装
APISIX 可以借助 quickstart 脚本快速安装并启动:
该命令启动 apisix-quickstart 和 etcd 两个容器,APISIX 使用 etcd 保存和同步配置。
APISIX 和 etcd 容器使用 Docker 的 host 网络模式,因此可以从本地直接访问。
注意: 需要提前安装docker环境
curl -sL https://run api7.ai/apisix/quickstart | bash
范例: 官方Docker启动脚本
[root@ubuntu2404 ~]#curl -sL https://run.api7.ai/apisix/quickstart
#!/bin/bash
#
## Licensed to the Apache Software Foundation (ASF) under one or more
## contributor license agreements. See the NOTICE file distributed with
## this work for additional information regarding copyright ownership.
## The ASF licenses this file to You under the Apache License, Version 2.0
## (the "License"); you may not use this file except in compliance with
## the License.  You may obtain a copy of the License at
#
##     http://www.apache.org/licenses/LICENSE-2.0
#
## Unless required by applicable law or agreed to in writing, software
## distributed under the License is distributed on an "AS IS" BASIS,
## WITHOUT WARRANTIES OR CONDITIONS OF ANY KIND, either express or implied.
## See the License for the specific language governing permissions and
## limitations under the License.
#

DEFAULT_ETCD_IMAGE_NAME="bitnami/etcd"
DEFAULT_ETCD_IMAGE_TAG="3.5.7"
DEFAULT_APISIX_IMAGE_NAME="apache/apisix"
DEFAULT_APISIX_IMAGE_TAG="3.6.0-debian"

DEFAULT_ETCD_LISTEN_HOST=0.0.0.0
DEFAULT_ETCD_LISTEN_PORT=2379
DEFAULT_APISIX_PORT=9180

DEFAULT_ETCD_NAME="etcd-quickstart"
DEFAULT_APP_NAME="apisix-quickstart"
DEFAULT_NET_NAME="apisix-quickstart-net"
DEFAULT_PROMETHEUS_NAME="apisix-quickstart-prometheus"

usage() {
  echo "Runs a Docker based Apache APISIX."
  echo
  echo "See the document for more information:"
  echo " https://docs.api7.ai/apisix/getting-started"
  exit 0
}

echo_fail() {
 printf "\e[31m✘ \e[0m$@\n"
}

echo_pass() {
 printf "\e[32m✔ \e[0m$@\n"
}

echo_warning() {
 printf "\e[33m⚠ $@\e[0m\n"
}

ensure_docker() {
  {
    docker ps -q >/dev/null 2>&1
  } || {
    return 1
  }
}

ensure_curl() {
  {
    curl -h >/dev/null 2>&1
  } || {
    return 1
  }
}

install_apisix() {
  echo "Installing APISIX with the quickstart options."
  echo
  echo "Creating bridge network ${DEFAULT_NET_NAME}."

  docker network create -d bridge $DEFAULT_NET_NAME && echo_pass "network ${DEFAULT_NET_NAME} created" || {
    echo_fail "Create network failed!"
    return 1
  }

  echo
  echo "Starting the container ${DEFAULT_ETCD_NAME}."

  docker run -d \
    --name ${DEFAULT_ETCD_NAME} \
    --network=$DEFAULT_NET_NAME \
    -e ALLOW_NONE_AUTHENTICATION=yes \
    -e ETCD_ADVERTISE_CLIENT_URLS=http://${DEFAULT_ETCD_LISTEN_HOST}:${DEFAULT_ETCD_LISTEN_PORT} \
    ${DEFAULT_ETCD_IMAGE_NAME}:${DEFAULT_ETCD_IMAGE_TAG} && echo_pass "etcd is listening on ${DEFAULT_ETCD_NAME}:${DEFAULT_ETCD_LISTEN_PORT}" || {
    echo_fail "Start etcd failed!"
    return 1
  }

  echo
  APISIX_DEPLOYMENT_ETCD_HOST="[\"http://${DEFAULT_ETCD_NAME}:${DEFAULT_ETCD_LISTEN_PORT}\"]"
  echo "Starting the container ${DEFAULT_APP_NAME}."

  docker run -d \
    --name ${DEFAULT_APP_NAME} \
    --network=$DEFAULT_NET_NAME \
    -p9080:9080 -p9180:9180 -p9443:9443 -p9090:9092 -p9100:9100 \
    -e APISIX_DEPLOYMENT_ETCD_HOST=${APISIX_DEPLOYMENT_ETCD_HOST} \
    ${DEFAULT_APISIX_IMAGE_NAME}:${DEFAULT_APISIX_IMAGE_TAG} && validate_apisix && sleep 2 || {
    echo_fail "Start APISIX failed!"
    return 1
  }

  docker exec ${DEFAULT_APP_NAME} /bin/bash -c "cat > /usr/local/apisix/conf/config.yaml" <<'EOF'
apisix:
  enable_control: true
  control:
    ip: "0.0.0.0"
    port: 9092
deployment:
  role: traditional
  role_traditional:
    config_provider: etcd
  admin:
    admin_key_required: false
    allow_admin:
      - 0.0.0.0/0
plugin_attr:
  prometheus:
    export_addr:
      ip: 0.0.0.0
      port: 9091
EOF

  docker exec ${DEFAULT_APP_NAME} apisix reload >>/dev/null 2>&1

  echo_warning "WARNING: The Admin API key is currently disabled. You should turn on admin_key_required and set a strong Admin API key in production for security."
  echo
}

destroy_apisix() {
  echo "Destroying existing ${DEFAULT_APP_NAME} container, if any."
  echo

  docker rm -f $DEFAULT_APP_NAME >>/dev/null 2>&1
  docker rm -f $DEFAULT_ETCD_NAME >>/dev/null 2>&1
  docker rm -f $DEFAULT_PROMETHEUS_NAME >>/dev/null 2>&1
  docker network rm $DEFAULT_NET_NAME >>/dev/null 2>&1

  sleep 2
}

validate_apisix() {
  local rv=0
  retry 30 curl "http://localhost:${DEFAULT_APISIX_PORT}/apisix/admin/services" >>/dev/null 2>&1 && echo_pass "APISIX is up" || rv=$?
}

main() {
  ensure_docker || {
    echo_fail "Docker is not available, please install it first"
    exit 1
  }

  ensure_curl || {
    echo_fail "curl is not available, please install it first"
    exit 1
  }

  destroy_apisix
  install_apisix || {
    exit 1
  }

  echo_pass "APISIX is ready!"
}

main "$@"

# 安装docker
[root@ubuntu2404 ~]#apt update && apt -y install docker.io

# 一键启动 APISIX
[root@ubuntu2404 ~]#curl -sL https://run.api7.ai/apisix/quickstart | sh

# 查看镜像
[root@ubuntu2404 ~]#docker images
REPOSITORY      TAG           IMAGE ID       CREATED        SIZE
apache/apisix   3.7.0-debian  6ce6a26190a6   12 days ago    284MB
bitnami/etcd    3.5.7         985a23c47893   7 months ago   146MB

# 查看容器(etcd 仅内部互通,未对外暴露端口)
[root@ubuntu2404 ~]#docker ps
CONTAINER ID   IMAGE                              COMMAND                  CREATED          STATUS          PORTS                                                                                     NAMES
20befff17ecc   apache/apisix:3.6.0-debian         "/docker-entrypoint.…"   43 seconds ago   Up 42 seconds   0.0.0.0:9080->9080/tcp, :::9080->9080/tcp, 0.0.0.0:9100->9100/tcp, :::9100->9100/tcp, 0.0.0.0:9180->9180/tcp, :::9180->9180/tcp, 0.0.0.0:9443->9443/tcp, :::9443->9443/tcp, 0.0.0.0:9090->9092/tcp, :::9090->9092/tcp   apisix-quickstart
c132befe013c   bitnami/etcd:3.5.7                 "/opt/bitnami/script…"   1 minute ago     Up 1 minute     2379-2380/tcp                                                                              etcd-quickstart

# 查看网络
[root@ubuntu2404 ~]#docker network ls
NETWORK ID     NAME                     DRIVER    SCOPE
d35c58509bd5   apisix-quickstart-net    bridge    local
56aa3e9c6ff3   bridge                   bridge    local
9590e295ef91   host                     host      local
beb23924d19b   none                     null      local

# 验证服务正常
[root@ubuntu2404 ~]#curl -sI "http://127.0.0.1:9080" | grep Server
Server: APISIX/3.6.0
2.5 Docker Compose 安装
https://apisix.apache.org/docs/apisix/installation-guide/#installing-apisix
范例: 基于 docker-compose 布署APISIX,ETCD和APISIX-Dashboard
#基于Docker-compose部署APISIX和Dashboard
#需要安装Docker和 Docker Compose
[root@ubuntu2404 ~]#apt update && apt -y install docker-compose
#注意:从2023年11月6日后面版本已经删除APISIX-Dashboard
#使用旧版的dashboard方法1
[root@ubuntu2404 ~]#git clone https://github.com/apache/apisix-docker.git
[root@ubuntu2404 ~]#cd apisix-docker/
#默认新版中删除了APISIX-Dashboard
[root@ubuntu2404 apisix-docker]#grep dashboard example/docker-compose.yml
- "./grafana_conf/dashboards:/var/lib/grafana/dashboards"
[root@ubuntu2404 apisix-docker]#cat example/docker-compose.yml
#
#Licensed to the Apache Software Foundation (ASF) under one or more
#contributor license agreements. See the NOTICE file distributed with
#this work for additional information regarding copyright ownership.
#The ASF licenses this file to You under the Apache License, Version 2.0
#(the "License"); you may not use this file except in compliance with
#the License. You may obtain a copy of the License at
#
# http://www.apache.org/licenses/LICENSE-2.0
#
#Unless required by applicable law or agreed to in writing, software
#distributed under the License is distributed on an "AS IS" BASIS,
#WITHOUT WARRANTIES OR CONDITIONS OF ANY KIND, either express or implied.
#See the License for the specific language governing permissions and
#limitations under the License.
#
version: "3"
services:
apisix:
image: apache/apisix:${APISIX_IMAGE_TAG:-3.7.0-debian}
restart: always
volumes:
- ./apisix_conf/config.yaml:/usr/local/apisix/conf/config.yaml:ro
depends_on:
- etcd
##network_mode: host
ports:
- "9180:9180/tcp"
- "9080:9080/tcp"
- "9091:9091/tcp"
- "9443:9443/tcp"
- "9092:9092/tcp"
networks:
apisix:
etcd:
image: bitnami/etcd:3.4.15
restart: always
volumes:
- etcd_data:/bitnami/etcd
environment:
ETCD_ENABLE_V2: "true"
ALLOW_NONE_AUTHENTICATION: "yes"
ETCD_ADVERTISE_CLIENT_URLS: "http://etcd:2379"
ETCD_LISTEN_CLIENT_URLS: "http://0.0.0.0:2379"
ports:
- "2379:2379/tcp"
networks:
apisix:
web1:
image: nginx:1.19.0-alpine
restart: always
volumes:
- ./upstream/web1.conf:/etc/nginx/nginx.conf
ports:
- "9081:80/tcp"
environment:
- NGINX_PORT=80
networks:
apisix:
web2:
image: nginx:1.19.0-alpine
restart: always
volumes:
- ./upstream/web2.conf:/etc/nginx/nginx.conf
ports:
- "9082:80/tcp"
environment:
- NGINX_PORT=80
networks:
apisix:
prometheus:
image: prom/prometheus:v2.25.0
restart: always
volumes:
- ./prometheus_conf/prometheus.yml:/etc/prometheus/prometheus.yml
ports:
- "9090:9090"
networks:
apisix:
grafana:
image: grafana/grafana:7.3.7
restart: always
ports:
- "3000:3000"
volumes:
- "./grafana_conf/provisioning:/etc/grafana/provisioning"
- "./grafana_conf/dashboards:/var/lib/grafana/dashboards"
- "./grafana_conf/config/grafana.ini:/etc/grafana/grafana.ini"
networks:
apisix:
networks:
apisix:
driver: bridge
volumes:
etcd_data:
driver: local
#查看commitid
[root@ubuntu2404 apisix-docker]#git log
commit aa6581dbbfa4e26dcf3f233e4a65f62ee4472d18 (HEAD -> master, origin/release/apisix-3.7.0, origin/master, origin/HEAD)
Author: AlinsRan <alinsran@apache.org>
Date: Thu Nov 23 18:02:03 2023 +0800
feat: release APISIX 3.7.0 (#521)
commit 8e3bf6f1ad0e9e1d4e3fca97bf3419cc24fbf690
Author: Gallardot <gallardot@apache.org>
Date: Wed Nov 22 17:19:34 2023 +0800
doc: fix typo (#520)
commit 2f226c7b606b06f4b5a35a782d482998f21cd640
Author: Liu Wei <monkeydluffy6017@gmail.com>
Date: Wed Nov 8 14:19:03 2023 +0800
feat: remove apisix-dashboard (#518)
commit 5720e8a520a34d7bf31a188576f4f3ea6ca07983
Author: Liu Wei <monkeydluffy6017@gmail.com>
Date: Tue Nov 7 16:11:54 2023 +0800
feat: remove apisix-dashboard (#516)
commit bf08d86aad95859e010a2cede7f5c697a3f71e2e
Author: Abhishek Choudhary <shreemaan.abhishek@gmail.com>
Date: Mon Oct 16 14:05:48 2023 +0545
chore: remove docker image scanning (#515)
........
#回滚至指定版本
[root@ubuntu2404 apisix-docker]#git reset --hard bf08d86aad95859e0
#确认回滚成功
[root@ubuntu2404 apisix-docker]#grep dashboard example/docker-compose.yml
apisix-dashboard:
image: apache/apisix-dashboard:3.0.1-alpine
- ./dashboard_conf/conf.yaml:/usr/local/apisix-dashboard/conf/conf.yaml
- "./grafana_conf/dashboards:/var/lib/grafana/dashboards"
#使用旧版的dashboard方法2
[root@ubuntu2404 ~]#unzip apisix-docker-master.zip
[root@ubuntu2404 ~]#cd apisix-docker-master/example
[root@ubuntu2404 example]#ls
apisix_conf docker-compose-arm64.yml docker-compose.yml grafana_conf prometheus_conf
dashboard_conf docker-compose-standalone.yml etcd_conf mkcert upstream
[root@ubuntu2404 example]#cat docker-compose.yml
#
## Licensed to the Apache Software Foundation (ASF) under one or more
## contributor license agreements. See the NOTICE file distributed with
## this work for additional information regarding copyright ownership.
## The ASF licenses this file to You under the Apache License, Version 2.0
## (the "License"); you may not use this file except in compliance with
## the License. You may obtain a copy of the License at
#
## http://www.apache.org/licenses/LICENSE-2.0
#
## Unless required by applicable law or agreed to in writing, software
## distributed under the License is distributed on an "AS IS" BASIS,
## WITHOUT WARRANTIES OR CONDITIONS OF ANY KIND, either express or implied.
## See the License for the specific language governing permissions and
## limitations under the License.
#
version: "3"
services:
apisix-dashboard:
image: apache/apisix-dashboard:3.0.1-alpine
restart: always
volumes:
- ./dashboard_conf/conf.yaml:/usr/local/apisix-dashboard/conf/conf.yaml
ports:
- "9000:9000"
networks:
apisix:
apisix:
image: apache/apisix:${APISIX_IMAGE_TAG:-3.6.0-debian}
restart: always
volumes:
- ./apisix_conf/config.yaml:/usr/local/apisix/conf/config.yaml:ro
depends_on:
- etcd
##network_mode: host
ports:
- "9180:9180/tcp"
- "9080:9080/tcp"
- "9091:9091/tcp"
- "9443:9443/tcp"
- "9092:9092/tcp"
networks:
apisix:
etcd:
image: bitnami/etcd:3.4.15
restart: always
volumes:
- etcd_data:/bitnami/etcd
environment:
ETCD_ENABLE_V2: "true"
ALLOW_NONE_AUTHENTICATION: "yes"
ETCD_ADVERTISE_CLIENT_URLS: "http://etcd:2379"
ETCD_LISTEN_CLIENT_URLS: "http://0.0.0.0:2379"
ports:
- "2379:2379/tcp"
networks:
apisix:
web1:
image: nginx:1.19.0-alpine
restart: always
volumes:
- ./upstream/web1.conf:/etc/nginx/nginx.conf
ports:
- "9081:80/tcp"
environment:
- NGINX_PORT=80
networks:
apisix:
web2:
image: nginx:1.19.0-alpine
restart: always
volumes:
- ./upstream/web2.conf:/etc/nginx/nginx.conf
ports:
- "9082:80/tcp"
environment:
- NGINX_PORT=80
networks:
apisix:
prometheus:
image: prom/prometheus:v2.25.0
restart: always
volumes:
- ./prometheus_conf/prometheus.yml:/etc/prometheus/prometheus.yml
ports:
- "9090:9090"
networks:
apisix:
grafana:
image: grafana/grafana:7.3.7
restart: always
ports:
- "3000:3000"
volumes:
- "./grafana_conf/provisioning:/etc/grafana/provisioning"
- "./grafana_conf/dashboards:/var/lib/grafana/dashboards"
- "./grafana_conf/config/grafana.ini:/etc/grafana/grafana.ini"
networks:
apisix:
networks:
apisix:
driver: bridge
volumes:
etcd_data:
driver: local
[root@ubuntu2404 example]#docker-compose -p docker-apisix up -d
[root@ubuntu2404 ~]#docker images
REPOSITORY TAG IMAGE ID CREATED SIZE
apache/apisix 3.6.0-debian 6d2ba652c010 7 months ago 286MB
apache/apisix-dashboard 3.0.1-alpine e7673027fec5 13 months ago 136MB
bitnami/etcd 3.4.15 8c7e00e786b8 3 years ago 132MB
prom/prometheus v2.25.0 a618f5685492 3 years ago 175MB
grafana/grafana 7.3.7 13afb861111c 3 years ago 187MB
nginx latest 2f011b116155 15 months ago 187MB
#指定项目名称才能查看到
[root@ubuntu2404 example]#docker-compose -p docker-apisix ps
Name Command State Ports
---------------------------------------------------------------------------------------------------------------------------------------------
docker-apisix_apisix-dashboard_1 /usr/local/apisix-dashboar ... Up 0.0.0.0:9000->9000/tcp,:::9000->9000/tcp
docker-apisix_apisix_1 /docker-entrypoint.sh dock ... Up 0.0.0.0:9080->9080/tcp,:::9080->9080/tcp,
0.0.0.0:9091->9091/tcp,:::9091->9091/tcp,
0.0.0.0:9092->9092/tcp,:::9092->9092/tcp,
0.0.0.0:9180->9180/tcp,:::9180->9180/tcp,
0.0.0.0:9443->9443/tcp,:::9443->9443/tcp
docker-apisix_etcd_1 /opt/bitnami/scripts/etcd/ ... Up 0.0.0.0:2379->2379/tcp,:::2379->2379/tcp, 2380/tcp
docker-apisix_grafana_1 /run.sh Up 0.0.0.0:3000->3000/tcp,:::3000->3000/tcp
docker-apisix_prometheus_1 /bin/prometheus --config.f ... Up 0.0.0.0:9090->9090/tcp,:::9090->9090/tcp
docker-apisix_web1_1 /docker-entrypoint.sh ngin ... Up 0.0.0.0:9081->80/tcp,:::9081->80/tcp
docker-apisix_web2_1 /docker-entrypoint.sh ngin ... Up 0.0.0.0:9082->80/tcp,:::9082->80/tcp
#可能看不到容器
[root@ubuntu2404 example]#docker-compose ps
Name Command State Ports
-------------------------------------------------------------------------------------------------------------
example_apisix-dashboard_1 /usr/local/apisix-dashboar ... Up 0.0.0.0:9000->9000/tcp,:::9000->9000/tcp
example_apisix_1 /docker-entrypoint.sh dock ... Up 0.0.0.0:9080->9080/tcp,:::9080->9080/tcp,
0.0.0.0:9091->9091/tcp,:::9091->9091/tcp,
0.0.0.0:9092->9092/tcp,:::9092->9092/tcp,
0.0.0.0:9180->9180/tcp,:::9180->9180/tcp,
0.0.0.0:9443->9443/tcp,:::9443->9443/tcp
example_etcd_1 /opt/bitnami/scripts/etcd/ ... Up 0.0.0.0:2379->2379/tcp,:::2379->2379/tcp, 2380/tcp
example_grafana_1 /run.sh Up 0.0.0.0:3000->3000/tcp,:::3000->3000/tcp
example_prometheus_1 /bin/prometheus --config.f ... Up 0.0.0.0:9090->9090/tcp,:::9090->9090/tcp
example_web1_1 /docker-entrypoint.sh ngin ... Up 0.0.0.0:9081->80/tcp,:::9081->80/tcp
example_web2_1 /docker-entrypoint.sh ngin ... Up 0.0.0.0:9082->80/tcp,:::9082->80/tcp
#确认APISIX启动
[root@ubuntu2404 ~]#curl -s "http://127.0.0.1:9080" --head | grep Server
Server: APISIX/3.6.0
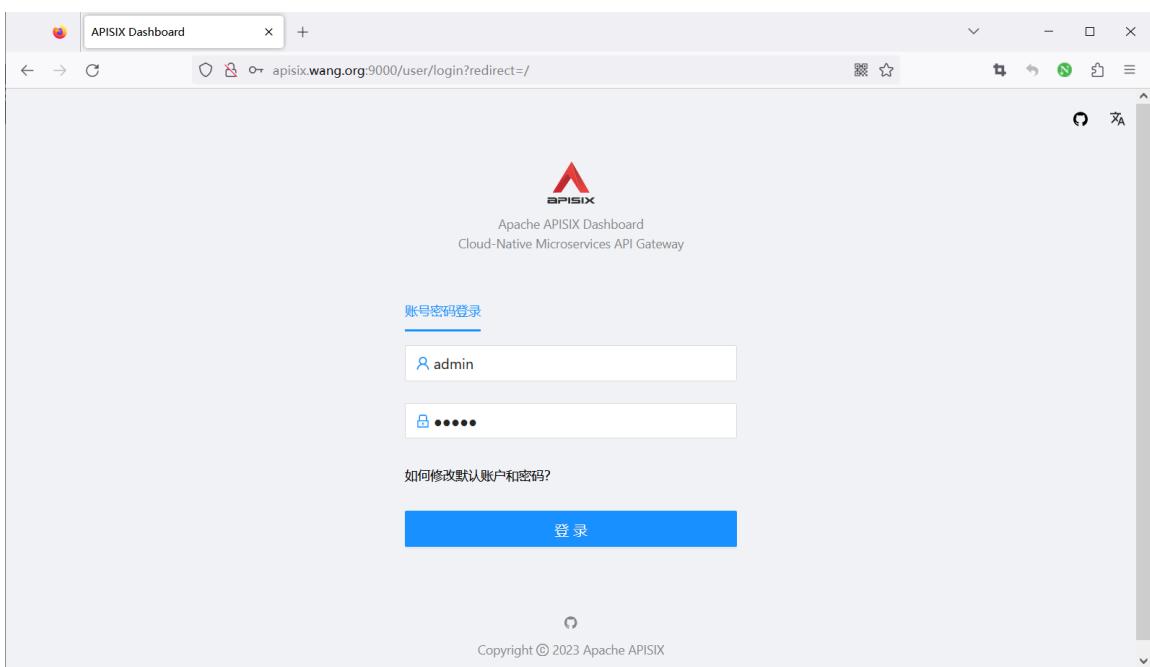
#浏览器访问dashboard,用户名和密码都是admin
2.6 Kubernetes 基于 Helm 安装
通过 Helm 安装 APISIX,请执行以下命令:
helm repo add apisix https://charts.apiseven.com
helm repo update
helm install apisix apisix/apisix --create-namespace --namespace apisix
三、APISIX 配置管理
3.1 APISIX 配置文件
https://apisix.apache.org/docs/apisix/installation-guide/#next-steps
配置 APISIX 方法
- By directly changing your configuration file ( conf/config.yaml ).
- By using the --config or the -c flag to pass the path to your configuration file while starting APISIX.
apisix start -c <path to config file>
APISIX将使用此配置文件中的配置信息,如果未配置任何配置,则将回退到默认配置。
注意
APISIX's default configuration can be found in `conf/config-default.yaml` file and it should not be modified. It is bound to the source code and the configuration should only be changed by the methods mentioned above.

The `conf/nginx.conf` file is automatically generated and should not be modified.

APISIX 的默认配置可以在 `conf/config-default.yaml` 文件中找到,不应修改。 它与源代码绑定,只能通过上述方法更改配置。`conf/nginx.conf` 文件是自动生成的,不应修改。
范例: 包安装默认配置文件
[root@ubuntu2404 ~]#cat /usr/local/apisix/conf/config.yaml
#
#Licensed to the Apache Software Foundation (ASF) under one or more
#contributor license agreements. See the NOTICE file distributed with
#this work for additional information regarding copyright ownership.
#The ASF licenses this file to You under the Apache License, Version 2.0
#(the "License"); you may not use this file except in compliance with
#the License.  You may obtain a copy of the License at
#
#     http://www.apache.org/licenses/LICENSE-2.0
#
#Unless required by applicable law or agreed to in writing, software
#distributed under the License is distributed on an "AS IS" BASIS,
#WITHOUT WARRANTIES OR CONDITIONS OF ANY KIND, either express or implied.
#See the License for the specific language governing permissions and
#limitations under the License.
#
#If you want to set the specified configuration value, you can set the new
#in this file. For example if you want to specify the etcd address:
#
#deployment:
# role: traditional
# role_traditional:
#   config_provider: etcd
# etcd:
#   host:
#     - http://127.0.0.1:2379
#
#To configure via environment variables, you can use `${{VAR}}` syntax. For instance:
#
#deployment:
# role: traditional
# role_traditional:
#   config_provider: etcd
# etcd:
#   host:
#     - http://${{ETCD_HOST}}:2379
#
#And then run `export ETCD_HOST=$your_host` before `make init`.
#
#If the configured environment variable can't be found, an error will be thrown.
#
#Also, If you want to use default value when the environment variable not set,
#Use `${{VAR:=default_value}}` instead. For instance:
#
#deployment:
# role: traditional
# role_traditional:
#   config_provider: etcd
# etcd:
#   host:
#     - http://${{ETCD_HOST:=localhost}}:2379
#
#This will find environment variable `ETCD_HOST` first, and if it's not exist it will use `localhost` as
default value.
#
deployment:
 role: traditional
 role_traditional:
   config_provider: etcd
 admin:
   admin_key:
      - name: admin
       key: edd1c9f034335f136f87ad84b625c8f1  # using fixed API token has security risk, please update it
when you deploy to production environment
       role: admin

#测试访问,默认不允许远程访问,只允许本地访问
[root@ubuntu2404 ~]#curl http://127.0.0.1:9180/apisix/admin/routes?api_key=edd1c9f034335f136f87ad84b625c8f1 -i
HTTP/1.1 200 OK
Date: Thu, 02 Nov 2023 07:56:33 GMT
Content-Type: application/json
Transfer-Encoding: chunked
Connection: keep-alive
Server: APISIX/3.2.2
Access-Control-Allow-Origin: *
Access-Control-Allow-Credentials: true
Access-Control-Expose-Headers: *
Access-Control-Max-Age: 3600
X-API-VERSION: v3

{"list":[],"total":0}
3.2 修改配置
范例: 将客户端访问的默认侦听端口9080配置为“8000”
#conf/config.yaml
[root@ubuntu2404 ~]#vim /usr/local/apisix/conf/config.yaml
#修改下面行
apisix:
  node_listen: 8000
......

[root@ubuntu2404 ~]#systemctl restart apisix.service

[root@ubuntu2404 ~]#ss -nltp|grep openresty
LISTEN 0     511         0.0.0.0:9180       0.0.0.0:*    users:(("openresty",pid=12121,fd=7),("openresty",pid=12120,fd=7),("openresty",pid=12119,fd=7))
LISTEN 0     511         0.0.0.0:8000       0.0.0.0:*    users:(("openresty",pid=12121,fd=13),("openresty",pid=12119,fd=13))
LISTEN 0     511         0.0.0.0:8000       0.0.0.0:*    users:(("openresty",pid=12120,fd=9),("openresty",pid=12119,fd=9))
LISTEN 0     511       127.0.0.1:9090       0.0.0.0:*    users:(("openresty",pid=12121,fd=6),("openresty",pid=12120,fd=6),("openresty",pid=12119,fd=6))
LISTEN 0     511       127.0.0.1:9091       0.0.0.0:*    users:(("openresty",pid=12124,fd=26))

LISTEN 0     511         0.0.0.0:9443       0.0.0.0:*    users:(("openresty",pid=12121,fd=15),("openresty",pid=12119,fd=15))
LISTEN 0     511         0.0.0.0:9443       0.0.0.0:*    users:(("openresty",pid=12120,fd=11),("openresty",pid=12119,fd=11))
LISTEN 0     511            [::]:8000          [::]:*    users:(("openresty",pid=12120,fd=10),("openresty",pid=12119,fd=10))
LISTEN 0     511            [::]:8000          [::]:*    users:(("openresty",pid=12121,fd=14),("openresty",pid=12119,fd=14))
LISTEN 0     511            [::]:9443          [::]:*    users:(("openresty",pid=12120,fd=12),("openresty",pid=12119,fd=12))
LISTEN 0     511            [::]:9443          [::]:*    users:(("openresty",pid=12121,fd=16),("openresty",pid=12119,fd=16))
范例: 修改 etcd地址更改为 http://etcd.wang.org:2379
#conf/config.yaml
[root@ubuntu2404 ~]#vim /usr/local/apisix/conf/config.yaml
apisix:
 node_listen: 8000
deployment:
 role: traditional
 role_traditional:
   config_provider: etcd
 etcd:
   host:
     - "http://etcd.wang.org:2379"

[root@ubuntu2404 ~]#systemctl restart apisix.service
范例: 更改 Admin API key
基于安全原因,需要更改默认的 Admin API key
https://apisix.apache.org/docs/apisix/installation-guide/#updating-admin-api-key

[root@ubuntu2404 ~]#vim /usr/local/apisix/conf/config.yaml
......
deployment:
  admin:
    admin_key:
      - name: "admin"
        key: newsupersecurekey  # 修改自定义密钥
        # key: edd1c9034335f136f87ad84b625c8f1  # 注释默认密钥
        role: admin

# 重启服务生效
[root@ubuntu2404 ~]#systemctl restart apisix.service

# 验证新密钥访问(两种方式都可以)
[root@ubuntu2404 ~]#curl -i http://127.0.0.1:9180/apisix/admin/routes -H "X-API-KEY: newsupersecurekey"
[root@ubuntu2404 ~]#curl -i http://127.0.0.1:9180/apisix/admin/routes?api_key=newsupersecurekey

# 返回结果
HTTP/1.1 200 OK
Date: Tue, 05 Dec 2023 11:00:21 GMT
Content-Type: application/json
Transfer-Encoding: chunked
Connection: keep-alive
Server: APISIX/3.6.0
Access-Control-Allow-Origin: *
Access-Control-Allow-Credentials: true
Access-Control-Expose-Headers: *
Access-Control-Max-Age: 3600
X-API-VERSION: v3

{"list":[],"total":0}
范例:打开远程管理功能
[root@ubuntu2404 ~]#vim /usr/local/apisix/conf/config.yaml
......
deployment:
  role: traditional
  role_traditional:
    config_provider: etcd
  admin:
    admin_listen:
      port: 9180
      ip: 0.0.0.0
    admin_api_version: v3
    admin_key:
      - role: admin
        #key: ogeBAJkDCqJZuDGZUABZRIBVQFvgqCSk #3.13.0默认key
        #key: KSUifDhEpsKLBhqvEpeKpQziNQVQwjie #新版默认key
        #key: ejMqSewssdcYOkDcCSxwFKxjvGkQHCsV #新版默认key
        #key: KIrRjALJLNAEMamUbcjmfLxguNkYAfZK #新版默认key
        key: edd1c9f034335f136f87ad84b625c8f1  #旧版默认key
        name: admin
    admin_key_required: true
    enable_admin_cors: true
    allow_admin:
      - 127.0.0.0/24
      - 10.0.0.0/24  #添加此行
      - 0.0.0.0/0    #任意远程主机都可以访问

#重启生效
[root@ubuntu2404 ~]#systemctl restart apisix.service

#测试远程访问API
[root@ubuntu2404 ~]#curl http://10.0.0.100:9180/apisix/admin/routes?api_key=edd1c9f034335f136f87ad84b625c8f1 -i
HTTP/1.1 200 OK
Date: Mon, 16 Dec 2024 03:45:00 GMT
Content-Type: application/json
Transfer-Encoding: chunked
Connection: keep-alive
Server: APISIX/3.11.0
Access-Control-Allow-Origin: *
Access-Control-Allow-Credentials: true
Access-Control-Expose-Headers: *
Access-Control-Max-Age: 3600
X-API-VERSION: v3

{"list":[],"total":0}